

The Moment I Wanted to Throw My Laptop Out the Window
I deployed my Next.js app. The data on the screen was three hours old. I refreshed the page. Still old. I cleared the browser cache. Still old. I redeployed. Still old.
If you’ve been there and if you’re reading this, chances are you have, then you already know the particular kind of frustration that Next.js caching causes. It’s not a bug you can see. There’s no red error in the console. Everything looks fine. The app is running. But the data is lying to you.
I spent a full day chasing a ghost before I finally understood what was actually happening under the hood. This article is everything I learned, written the way I wish someone had explained it to me: plainly, honestly, and without skipping the parts that actually matter.
Let’s go.
First, Why Does NextJS Even Cache Aggressively?
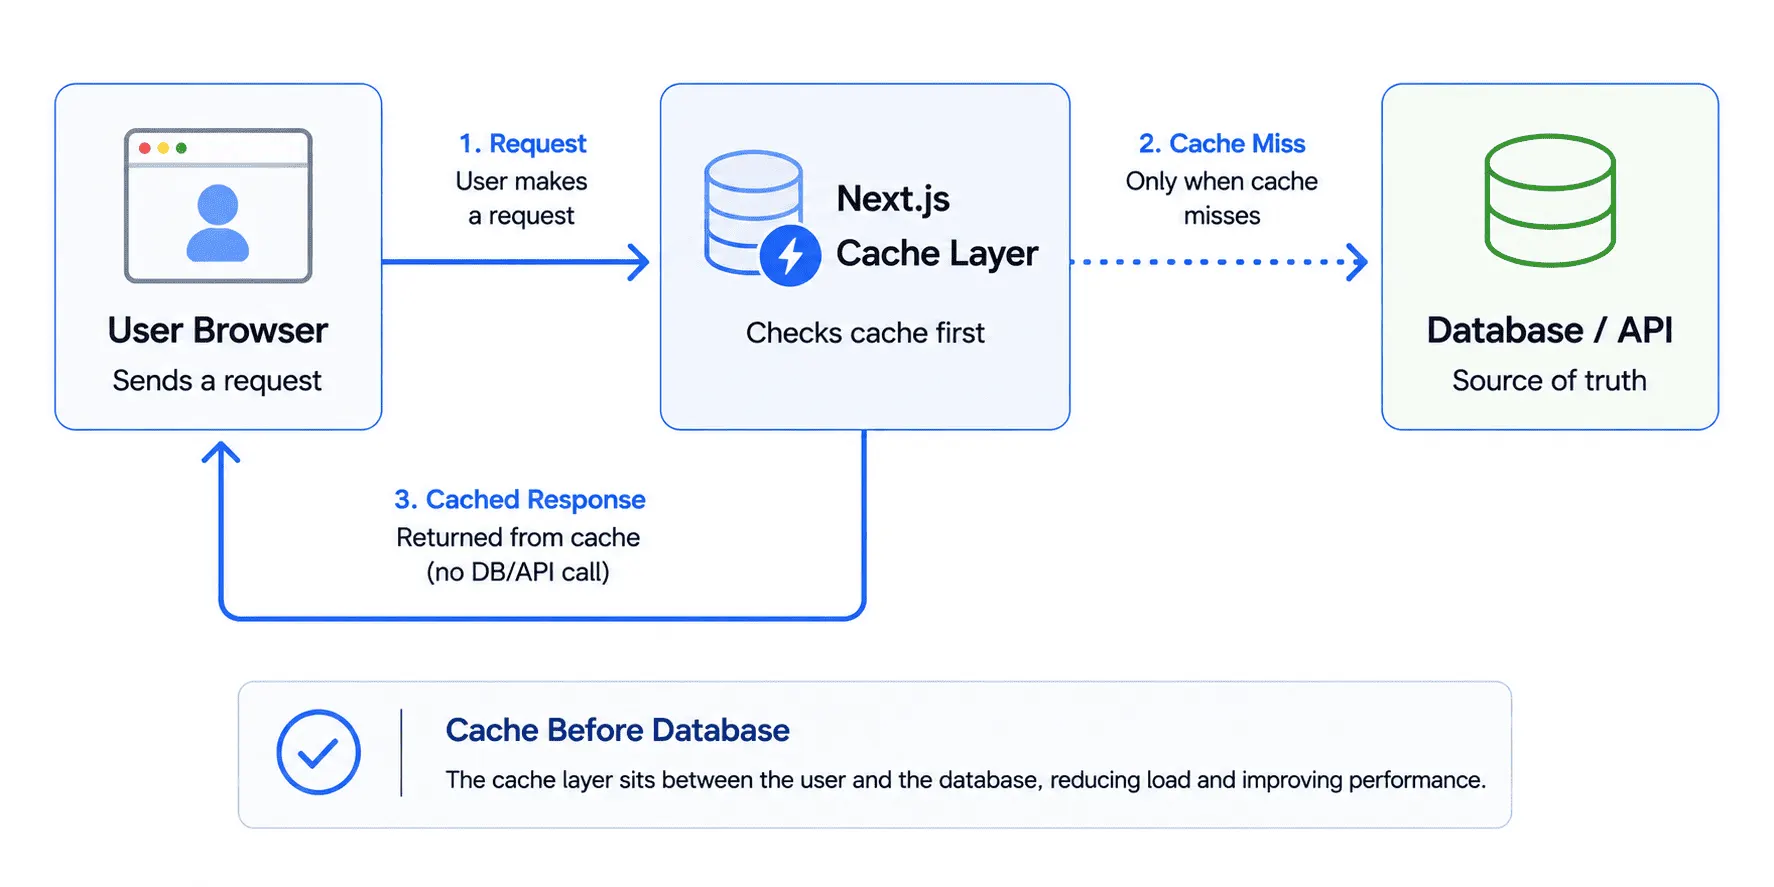
Before you curse the cache, it helps to understand why it exists. Next.js is built around one obsession: making your site fast. And the fastest way to serve a page is to never have to build it again. So by default, Next.js caches everything it possibly can at build time, at request time, and on the server.
This is great for performance. It’s terrible for developers who don’t know it’s happening.
The core idea is: “If nothing has changed, serve what we already have.” The problem is that Next.js doesn’t always know when something has changed. And unless you tell it, it assumes nothing ever does.
The Four Cache Layers You Need to Know About
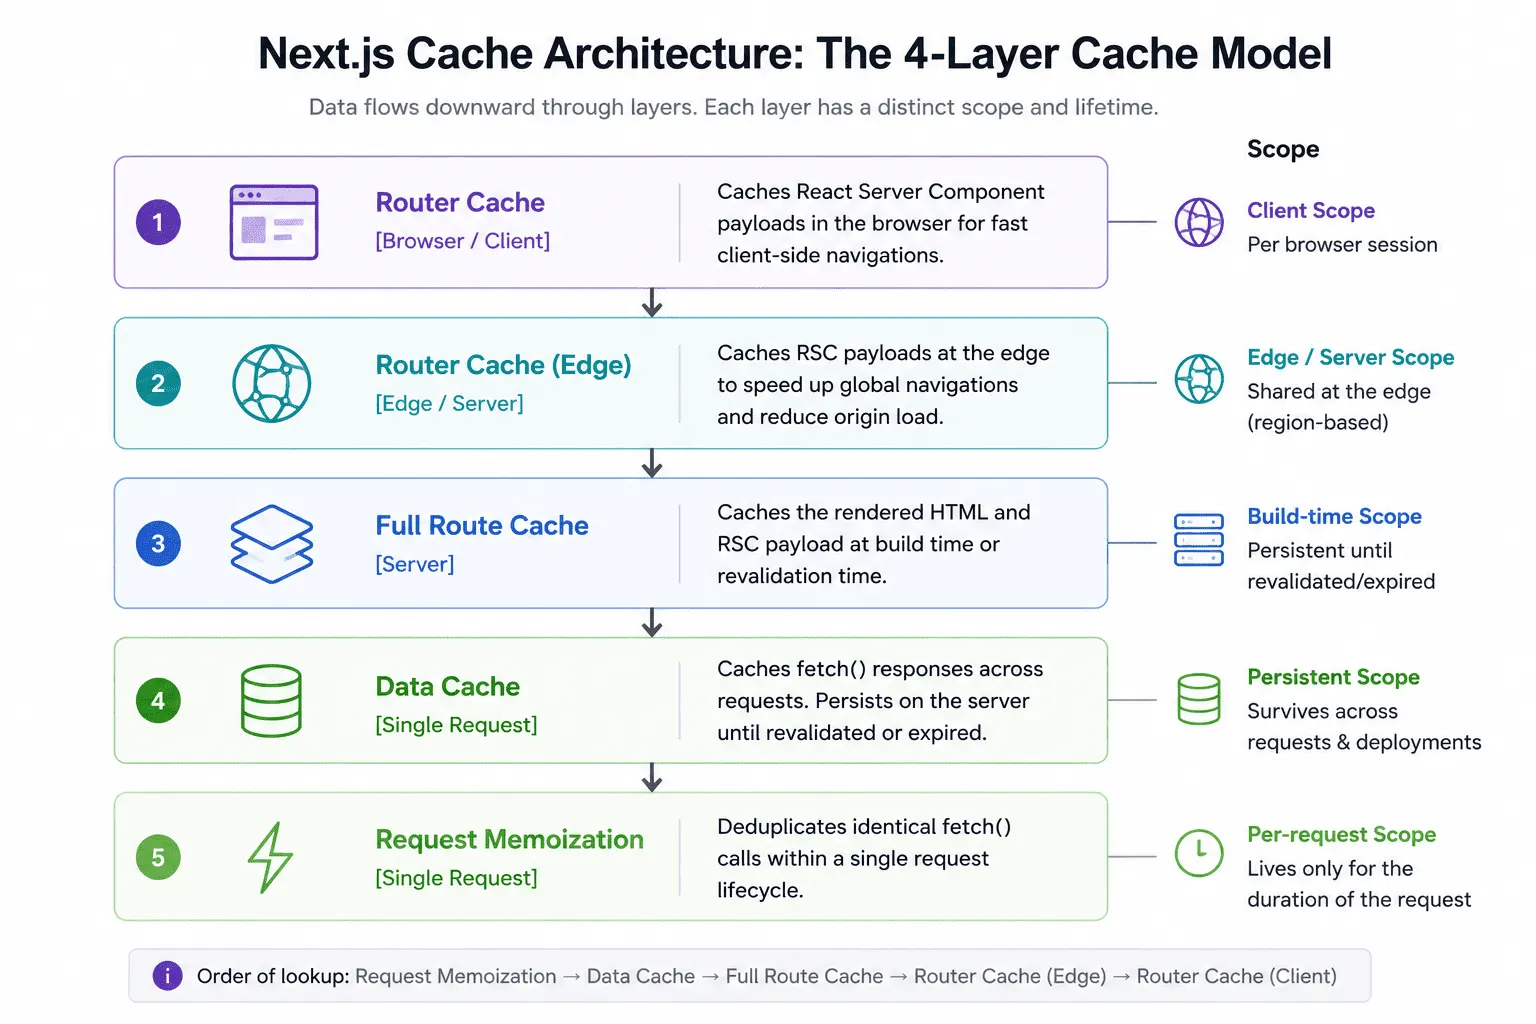
This is where most explanations lose people. Next.js doesn’t have one cache it has four, and they all behave differently. Let me walk you through each one.
1. Request Memoization (In-Memory, Per Request)
This one is the least scary. When you call fetch() multiple times with the same URL during a single server request, Next.js is smart enough to only hit the network once. It holds the result in memory and reuses it for that single render cycle. Think of it as “deduplication.” It resets with every new incoming request, so it’s not the one that causes stale-data headaches.
2. Data Cache (Persistent, Server-Side)
This is the one that trips people up the most. By default, Next.js persists fetch() responses on the server between deployments and requests. Once a piece of data is fetched and stored, it stays there until you explicitly tell Next.js to throw it away. This is the main culprit behind stale data.
3. Full Route Cache (Static Page Cache)
When you build your Next.js app, any route that can be statically rendered gets turned into a static HTML file. This file is then served directly, with no server-side code runs, no database is touched. It’s blazing fast. But if your data changes after the build, the page doesn’t know.
4. Router Cache (Client-Side)
On the browser side, Next.js caches page segments in memory as you navigate between routes. This means if you visit a page, go somewhere else, and come back, Next.js may serve you the version from memory instead of fetching fresh content. This resets when you do a full page reload, but for single-page navigation, it’s very much active.
How Cache Actually Starts: What Happens When You Run next build
Here’s the sequence of events that sets everything in motion:
- You run
next build. - Next.js crawls your pages and components.
- For every
fetch()call it finds, it makes the request and stores the response in the Data Cache. - For every route that doesn’t use dynamic data (cookies, headers, search params), it renders a full HTML page and saves it to the Full Route Cache.
- You deploy. Those cached responses and HTML files come with the deployment.
At this point, your app is essentially running off snapshots of your data from the moment you ran build. If your database changes after that, the deployed pages won’t know unless you’ve set up a way to tell them.
This is not a bug. It’s the intended behavior. But it’s a behavior you need to consciously work with not against.
The Problems You’ve Probably Already Faced
Let me name them, because seeing your pain reflected back is oddly comforting:
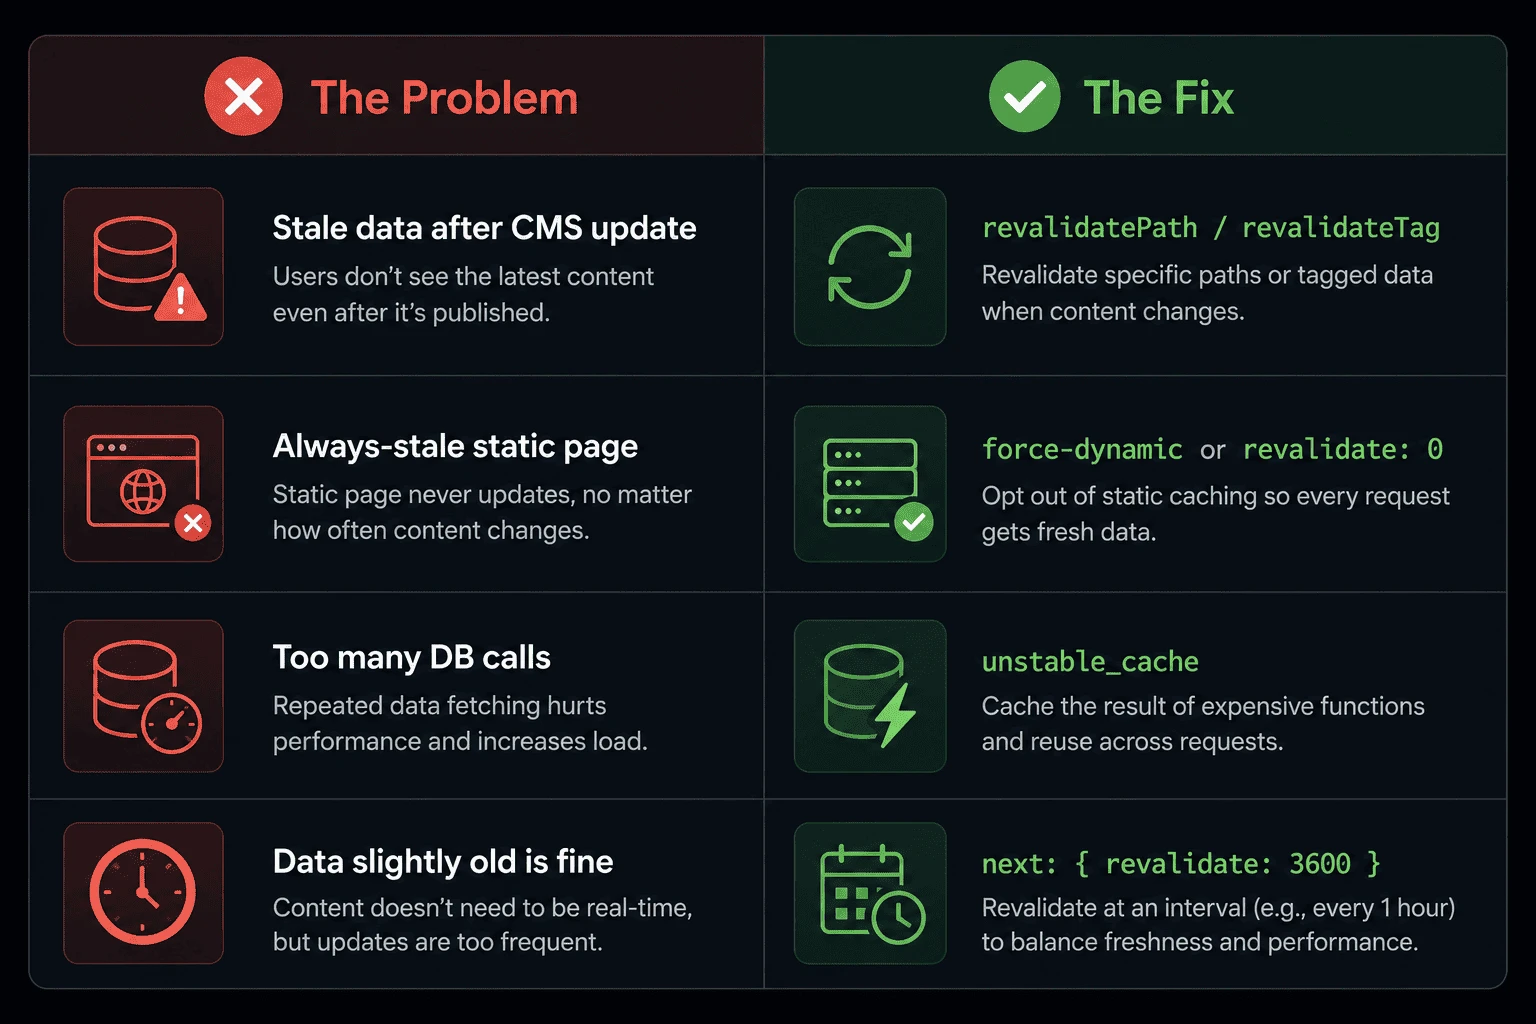
- You updated a blog post in your CMS, but the live site still shows the old version.
- You added a new product to your database, but the product listing page doesn’t show it.
- Your dashboard shows numbers from this morning, even though it’s 5pm.
- You redeployed, and the data is still stale because the cache survived the deployment.
- On-demand revalidation works in development but not in production.
Every single one of those comes down to one of those four cache layers holding onto old data longer than you want it to.
Step-by-Step: How to Fix Next.js Caching Problems
Now the good part. Here’s how you actually solve these issues, in order from simplest to most powerful.
Fix #1 Opt Out of Caching for a Specific Fetch
The quickest fix. If you just want one specific request to always go fresh, set the cache option to 'no-store':
const data = await fetch('https://api.example.com/posts', {
  cache: 'no-store',
});
This tells Next.js: “Never cache this. Every request should hit the network.” Use it when your data changes frequently and you always need the freshest version like a live feed, stock prices, or notifications.
For more details on fetch options, see the official Next.js fetch documentation.
Fix #2 Set a Revalidation Time (ISR Style)
If you don’t need data to be live-real-time, but you also don’t want it to be days old, use next.revalidate:
const data = await fetch('https://api.example.com/posts', {
  next: { revalidate: 3600 }, // revalidate every 1 hour
});
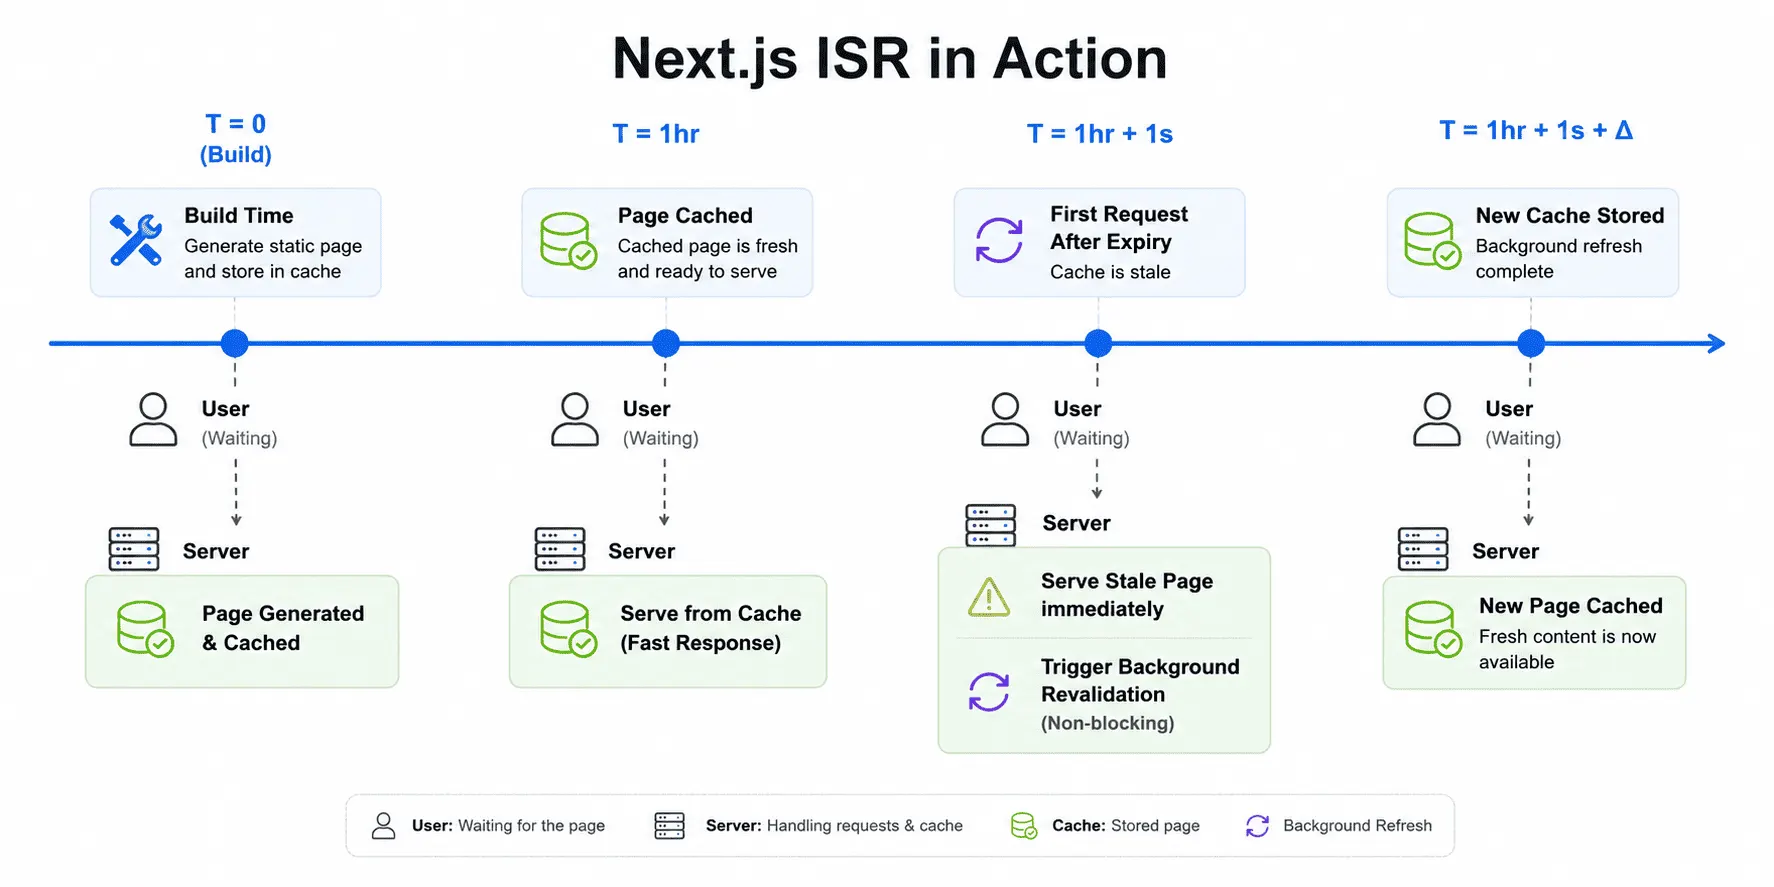
This is the Incremental Static Regeneration (ISR) approach. Next.js will serve the cached version but silently refresh it in the background after the time you specify (in seconds). It’s a great balance between performance and freshness for most use cases.
Learn more about ISR in the Next.js ISR documentation.
Fix #3 Revalidate by Path (On-Demand)
This is the “I want control” option. Instead of waiting for a timer, you trigger revalidation manually typically from an API route or a webhook from your CMS.
// app/api/revalidate/route.ts
import { revalidatePath } from 'next/cache';
import { NextRequest } from 'next/server';

export async function POST(request: NextRequest) {
  revalidatePath('/blog'); // clears the cache for /blog
  return Response.json({ revalidated: true });
}
Now your CMS (like Sanity, Contentful, or WordPress) can send a webhook to this endpoint every time content changes. The moment content is published, your Next.js site invalidates the cache and the next visitor gets fresh data.
Fix #4 Revalidate by Tag (Fine-Grained Control)
If you have many pages that share the same data, revalidateTag is your best friend. First, tag your fetches:
const data = await fetch('https://api.example.com/posts', {
  next: { tags: ['posts'] },
});
Then, when posts change, invalidate everything with that tag:
import { revalidateTag } from 'next/cache';

revalidateTag('posts'); // clears ALL fetches tagged with 'posts'
This is incredibly powerful for apps with complex data relationships. One revalidateTag('products') call can instantly refresh every product listing, product detail page, and category page across your entire site.
Fix #5 Force Dynamic Rendering for a Route
Sometimes you just want a page to never be statically cached. Add this at the top of your page or layout file:
export const dynamic = 'force-dynamic';
This turns off static rendering for that route entirely. Every request will be handled by the server in real time. Use this for dashboards, user-specific pages, or anything that needs live data on every visit.
// You can also use these at the route level:
export const revalidate = 0; // same as 'no-store' for the whole route
export const revalidate = 3600; // ISR for the whole route
Fix #6 Use unstable_cache for Non-Fetch Data
Not all data comes from fetch(). If you’re querying a database directly with Prisma, Drizzle, or raw SQL, Next.js can’t automatically cache it. That’s where unstable_cache comes in:
import { unstable_cache } from 'next/cache';
import { db } from '@/lib/db';

const getCachedPosts = unstable_cache(
  async () => {
    return await db.posts.findMany();
  },
  ['posts-list'],          // cache key
  {
    tags: ['posts'],       // for revalidateTag support
    revalidate: 3600,      // optional TTL
  }
);
This wraps your database call with the same caching infrastructure that fetch() uses, giving you full control over revalidation.
See the full API in the unstable_cache reference docs.
How to Pause / Disable Caching Entirely (For Debugging or Development)
Sometimes you just want the cache to go away while you figure things out. Here’s how.
Option A — Development Mode Already Does This (Mostly)
In next dev, The Data Cache and Full Route Cache are largely disabled by default. If you’re seeing caching behaviour in development, double-check you’re not running a production build locally.
Option B — Globally Disable Data Cache
In your next.config.js:
/** @type {import('next').NextConfig} */
const nextConfig = {
  experimental: {
    staleTimes: {
      dynamic: 0,
    },
  },
};

module.exports = nextConfig;
Option C — Use Environment Variables in Fetch Defaults
A clean pattern for toggling caching per environment:
const data = await fetch('https://api.example.com/data', {
  cache: process.env.NODE_ENV === 'development' ? 'no-store' : 'force-cache',
});
Option D — Bust the Cache During Deployment
On Vercel, the Data Cache can survive redeployments. To force a full cache bust on deploy, go to your project settings → Environment Variables and add:
NEXT_CACHE_BUST = "your-unique-value-here"
Change the value on each deployment to invalidate all server-side caches. Alternatively, Vercel has a built-in button to manually purge cache in the deployment panel.
Read more about Vercel’s caching behaviour in their Data Cache documentation.
A Real-World Workflow That Actually Works
Here’s the mental model I now use for every page I build in Next.js:
- Ask: How often does this data change?
- Never → use
force-cache(or omit, it’s the default) - Every hour → use
revalidate: 3600 - On publish → set up a CMS webhook +
revalidatePathorrevalidateTag - Every request → use
no-storeorforce-dynamic
- Never → use
- Ask: Is this data shared across many pages? If yes, use tags so you can invalidate everything at once.
- Ask: Is this a database call, not a fetch? Wrap it in
unstable_cache.
That’s it. Three questions. Once you build this habit, caching stops being a source of mystery and becomes a superpower.
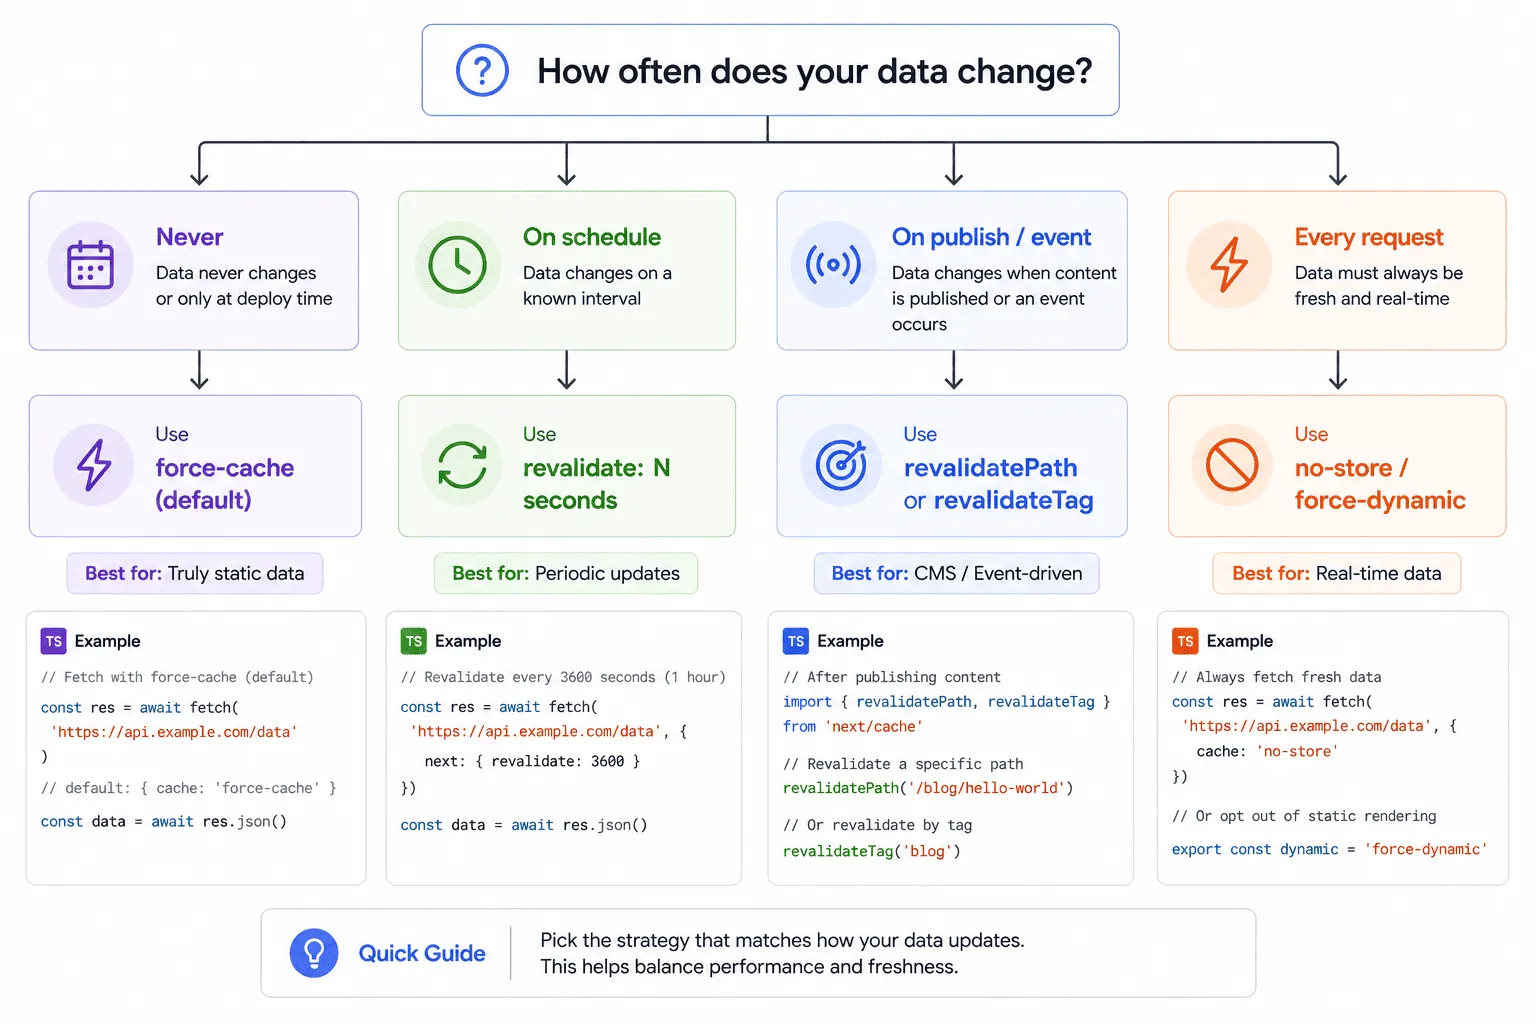
Quick Reference: Next.js Cache Fix Cheat Sheet
| Situation | Solution |
|---|---|
| Page shows stale data after deploy | revalidatePath() or redeploy with cache bust |
| CMS update not showing on live site | Set up webhook → revalidatePath() or revalidateTag() |
| Need always-fresh data (live feed) | cache: 'no-store' on the fetch |
| The page needs to be dynamic always | export const dynamic = 'force-dynamic' |
| DB queries are not being cached | Wrap with unstable_cache() |
| Hourly refresh is fine | next: { revalidate: 3600 } |
| Disable cache in dev only | process.env.NODE_ENV === 'development' ? 'no-store' : 'force-cache' |
| Many pages share the same data tag | Use tags: ['name'] + revalidateTag('name') |
Common Mistakes to Avoid
- Calling
revalidatePath()from the wrong place. It must be called in a Server Action or Route Handler, not from client-side code. - Forgetting that the Router Cache is client-side.
revalidatePathclears the server cache. The user might still see the old version until they hard reload or until the client-side cache expires (30s for dynamic, 5 minutes for static segments). - Using
no-storeeverywhere “just to be safe.” You lose the entire performance benefit of Next.js caching. Be intentional. - Not testing in production mode.
next devskips many caches. Always test cache behaviournext build && next startbefore deploying.
For a deep dive into how caching interacts with the App Router, the official Next.js caching documentation is genuinely excellent and worth bookmarking.
Wrapping Up: The Cache Is Not Your Enemy
The Next.js cache isn’t broken. It’s just opinionated, and those opinions are built around performance rather than convenience. Once you understand the four layers and the mental model behind each one, the whole system starts to make sense.
You’re not fighting the cache anymore. You’re working with it.
If you’re building on Next.js 14 or 15 and still running into specific issues, drop them in the comments or connect with me here. I’ll do my best to answer. And if this article saved you a few hours of confusion, share it with a teammate who’s probably dealing with the same thing right now.
They’ll thank you for it.
Further reading: Next.js Caching Overview — Vercel Data Cache — revalidatePath API Reference — revalidateTag API Reference — use ChatGPT for Work