The 2am CI failure that finally made me switch
It was a Tuesday night, and our deployment pipeline was blocked. Again.
I had written what I thought was a solid Selenium test for our checkout flow. It passed locally every single time. In CI it failed roughly one in three runs with StaleElementReferenceException. My “fix” was to add more Thread.sleep() calls and pray. The test got slower. The flakiness got worse. And I spent three hours on a Tuesday night doing something that should have taken thirty minutes.
A colleague dropped a link in Slack the next morning: “Just try Playwright.” I was skeptical. I had heard that before about Cypress. But I gave it a weekend and I never went back.
This tutorial is what I wish someone had handed me on that Thursday morning. By the end of it, you will have a working automated test suite running against real browsers, with a config that actually makes sense and zero sleep() calls anywhere in the code.
What Playwright actually is
Playwright is an open-source end-to-end testing framework built by Microsoft that lets you automate Chromium, Firefox, and WebKit using a single, consistent API.
The phrase “end-to-end testing” means you are testing your application the way a real user would use it: opening a browser, navigating to a URL, clicking buttons, filling forms, and asserting that what appears on screen matches what you expected. No mocking, no stubs, no shortcuts. Real browser, real behavior.
What separates Playwright from everything that came before it is how it talks to the browser. Older tools like Selenium were built on WebDriver, a protocol that works by sending HTTP commands to a browser driver. Playwright uses the Chrome DevTools Protocol and equivalent native protocols for Firefox and WebKit. The browser tells Playwright when it is ready instead of being asked repeatedly. The same 500-test suite that runs for two hours with 40 to 50 flaky failures in older setups finishes in 25 minutes with fewer than 10 in Playwright.
That is not marketing language. I have seen it firsthand on our own test suite.
What you need before starting
The prerequisites for this tutorial are minimal on purpose. You need Node.js 18 or higher installed on your machine. That is it. Playwright ships its own browser binaries and its own test runner. You do not need to install ChromeDriver, GeckoDriver, or any external browser drivers separately.
Check your Node version before starting:
node --version
# Should print v18.0.0 or higher
# If not: https://nodejs.org/en/download
The examples in this tutorial are written in TypeScript because Playwright’s TypeScript support gives you autocompletion, inline type errors, and IDE navigation that saves real time when you are learning a new API. If you prefer JavaScript, every example here works with .js extensions and without the type annotations.
Step 1: Install Playwright in ten seconds
Open a terminal, navigate to your project directory, and run this:
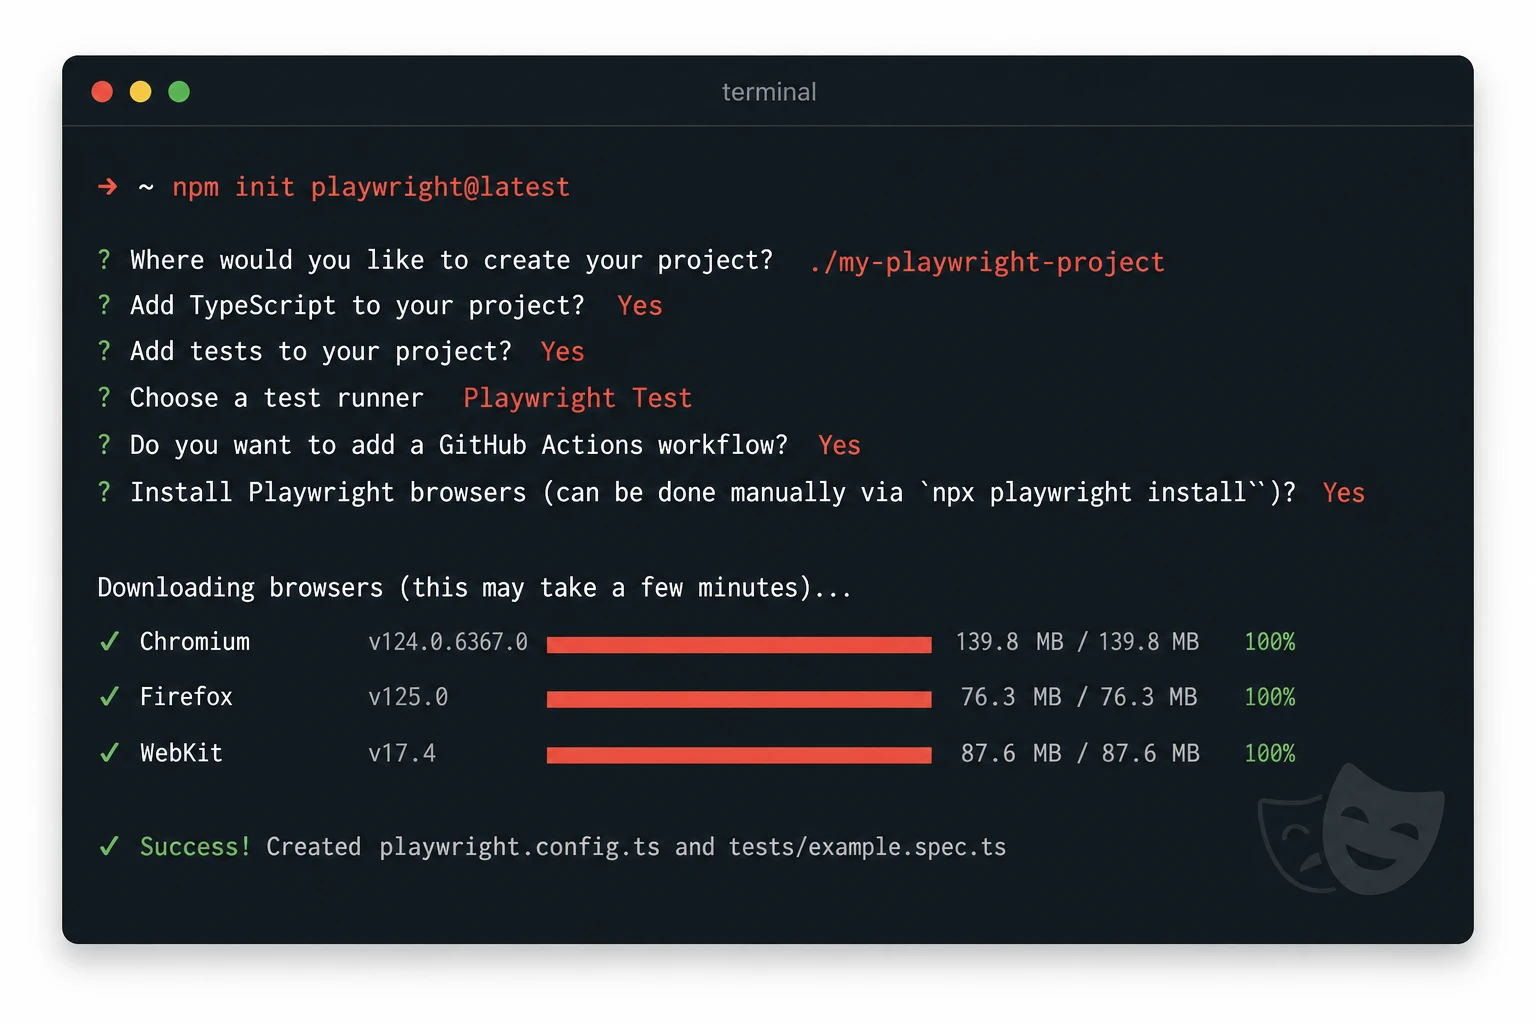
# In a new or existing project directory
npm init playwright@latest
The CLI asks you four questions. Here is what to choose if you are following along:
Do you want to use TypeScript or JavaScript? » TypeScript
Where to put your end-to-end tests? » tests
Add a GitHub Actions workflow? » true
Install Playwright browsers? » true
When it finishes, your project has a playwright.config.ts file, a tests/ directory with an example test, and a .github/workflows/playwright.yml file ready to use. The installer also downloads Chromium, Firefox, and WebKit browser binaries into a local cache.
That whole process takes under two minutes on a decent internet connection. No manual driver downloads. No PATH configuration. Nothing to fight with.
Step 2: Understand the generated config file
Before you write your first test, open playwright.config.ts and read it. Most tutorials skip this step. It is the step that causes the most confusion when something goes wrong later.
// playwright.config.ts
import { defineConfig, devices } from '@playwright/test';

export default defineConfig({
  // Directory where test files live
  testDir: './tests',

  // How long a single test can run before failing
  timeout: 30 * 1000,

  // Re-run failed tests once before marking them as failed
  retries: process.env.CI ? 2 : 0,

  // Run tests in parallel using multiple workers
  workers: process.env.CI ? 1 : undefined,

  // What to include in the test report
  reporter: 'html',

  use: {
    // Base URL so tests can use relative paths like page.goto('/')
    baseURL: 'http://localhost:3000',

    // Record a trace on the first retry of a failed test
    trace: 'on-first-retry',
  },

  // Test against three browser engines
  projects: [
    {
      name: 'chromium',
      use: { ...devices['Desktop Chrome'] },
    },
    {
      name: 'firefox',
      use: { ...devices['Desktop Firefox'] },
    },
    {
      name: 'webkit',
      use: { ...devices['Desktop Safari'] },
    },
  ],
});
The baseURL field is the one I always set immediately. When it is configured, you can write page.goto('/') in your tests instead of page.goto('http://localhost:3000') everywhere. Change it to match whatever URL your app runs on locally.
The retries: 2 On CI is intentional. Playwright tests are stable, but network conditions in CI runners are not. Two retries on a genuinely flaky test give you confidence that a failure is real before it blocks your deploy.
Step 3: Write your first real test
Open tests/example.spec.ts. You will see a generated test that navigates to the Playwright website. Delete it and write this instead:
// tests/homepage.spec.ts
import { test, expect } from '@playwright/test';

test('homepage loads and shows the main heading', async ({ page }) => {
  // Navigate to the root URL (uses baseURL from config)
  await page.goto('/');

  // Assert the page title contains your app name
  await expect(page).toHaveTitle(/My App/);

  // Find the main heading using an accessible role locator
  const heading = page.getByRole('heading', { level: 1 });

  // Assert it is visible on screen
  await expect(heading).toBeVisible();
});

test('user can navigate to the about page', async ({ page }) => {
  await page.goto('/');

  // Find the link by its visible text
  const aboutLink = page.getByRole('link', { name: 'About' });
  await aboutLink.click();

  // Assert the URL changed to the about page
  await expect(page).toHaveURL('/about');

  // Assert the about page has its own heading
  await expect(page.getByRole('heading', { name: 'About Us' })).toBeVisible();
});
Notice what is not in that code. There are no waitForElement() calls. There are no sleep() calls. There is no explicit timeout on the click. Playwright handles all of that automatically through its auto-waiting mechanism.
Every expect() assertion in Playwright retries until the condition is met or the timeout is reached. When you write await expect(heading).toBeVisible(), Playwright keeps checking whether that element is visible for up to 30 seconds before failing the test. You do not have to ask it to wait. That is the default behavior.
Step 4: The right way to find elements
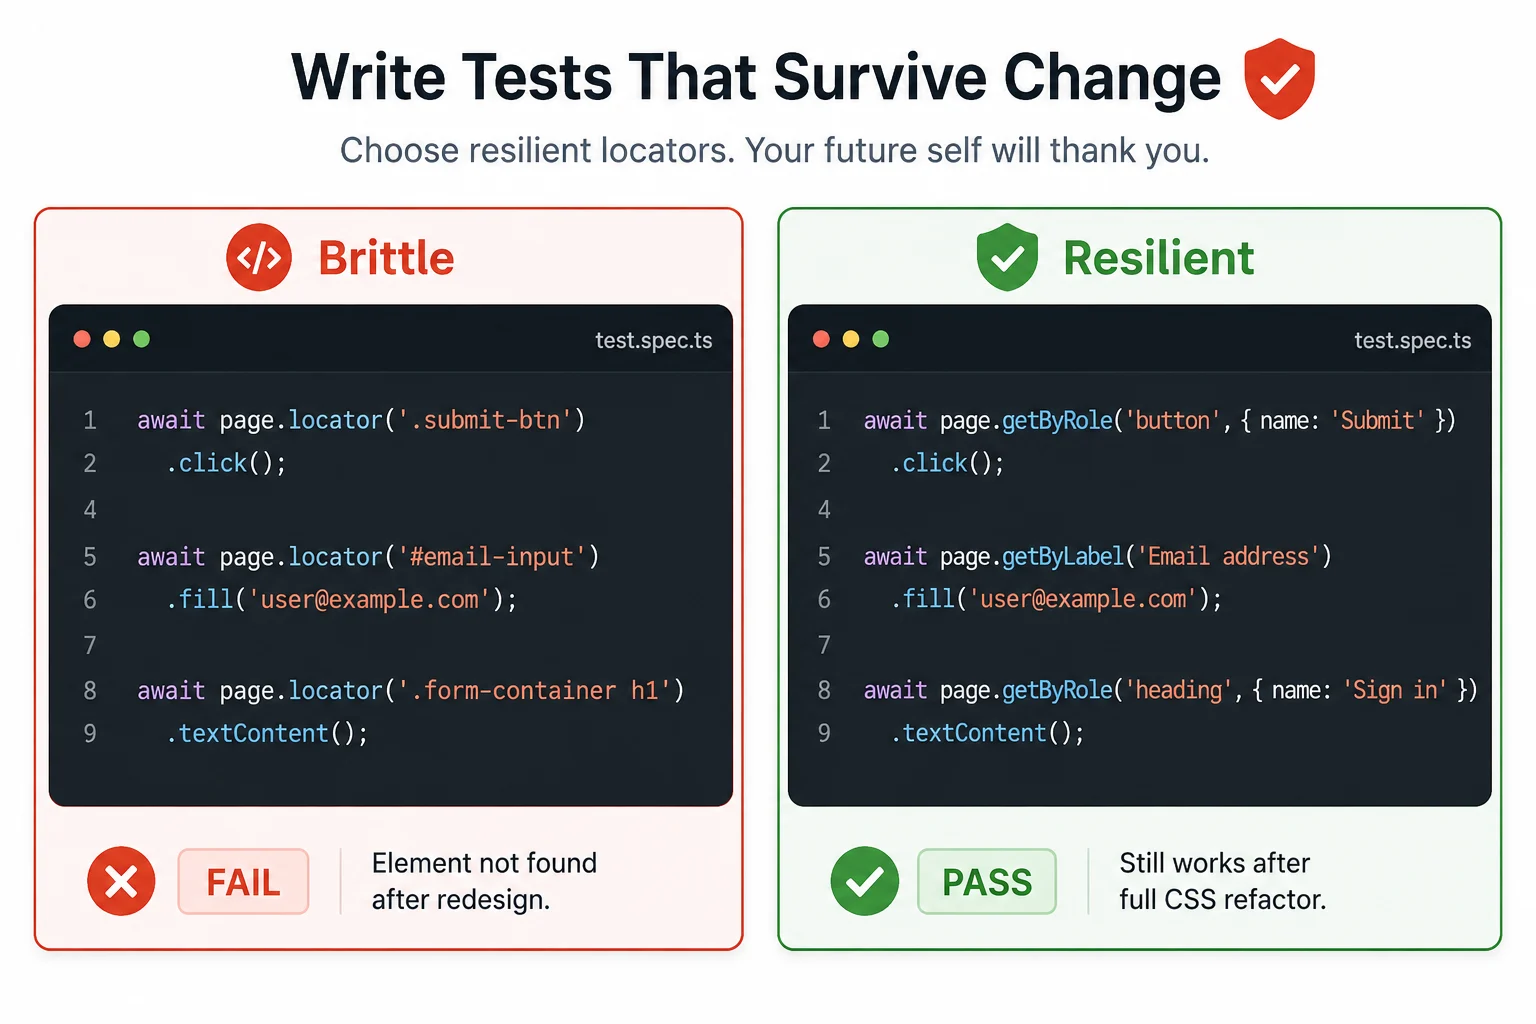
This is the section that changes how you write tests forever. The selector you use determines whether your test is brittle or resilient.
The old approach was to find elements by CSS class or XPath: page.locator('.btn-primary') or page.locator('#submit-button'). These selectors break the moment a designer renames a class or a developer changes an ID. They also give you zero signal about what the element actually does from a user’s perspective.
Playwright’s built-in role-based locators find elements the way a screen reader would find them. They are resilient to style changes and they make your tests read like a description of user behavior:
// Role-based locators: preferred and resilient
page.getByRole('button', { name: 'Submit' })
page.getByRole('textbox', { name: 'Email address' })
page.getByRole('link', { name: 'Sign in' })
page.getByRole('heading', { name: 'Welcome back' })

// Label-based locator: great for form inputs
page.getByLabel('Password')

// Placeholder-based: works when there is no label
page.getByPlaceholder('Search products...')

// Text content: for elements with unique visible text
page.getByText('Terms and conditions')

// Test ID: use as a last resort when nothing else fits
page.getByTestId('checkout-total')

// CSS/XPath locators: avoid these unless no alternative exists
// page.locator('.btn-primary')   ← brittle, breaks on redesign
// page.locator('#submit')        ← brittle, breaks on ID change
I spent the first week using page.locator() with CSS selectors because that is what I knew from Selenium. My tests kept breaking during frontend refactors. Once I switched to getByRole() and getByLabel() A complete redesign of our login page did not break a single test. The buttons still had the same accessible names. That is what made the difference.
Step 5: run your tests and read the output
Run the test suite with this command:
# Run all tests across all configured browsers
npx playwright test

# Run only the homepage tests
npx playwright test homepage

# Run in headed mode to watch the browser open
npx playwright test --headed

# Run against a single browser only
npx playwright test --project=chromium

# Open the interactive UI mode (my personal favorite for development)
npx playwright test --ui
The --ui flag is the one I use constantly during test development. It opens a visual test runner that shows every test, lets you run them individually, watches for file changes and re-runs automatically, and shows screenshots and traces for failures. It is like having a debugging environment built into the test runner.
When a test fails, Playwright generates an HTML report automatically. Open it with:
npx playwright show-report
The report shows which tests failed, the exact line that failed, a screenshot at the moment of failure, and a full trace you can step through like a video recording of what the browser did. I have debugged more production-environment test failures in ten minutes using the trace viewer than I spent entire afternoons debugging with console logs in Selenium.
Step 6: Write a test that interacts with forms
Real applications have login forms, search boxes, and submission flows. Here is a complete test for a login page that covers all the patterns you will use most often:
// tests/login.spec.ts
import { test, expect } from '@playwright/test';

test.describe('Login page', () => {

  test('shows an error on invalid credentials', async ({ page }) => {
    await page.goto('/login');

    // Fill the form using label-based locators
    await page.getByLabel('Email').fill('wrong@example.com');
    await page.getByLabel('Password').fill('wrongpassword');

    // Click the submit button
    await page.getByRole('button', { name: 'Log in' }).click();

    // Assert the error message appears
    await expect(page.getByText('Invalid email or password')).toBeVisible();

    // Assert we are still on the login page
    await expect(page).toHaveURL('/login');
  });

  test('redirects to dashboard after successful login', async ({ page }) => {
    await page.goto('/login');

    await page.getByLabel('Email').fill('user@example.com');
    await page.getByLabel('Password').fill('correctpassword');
    await page.getByRole('button', { name: 'Log in' }).click();

    // Playwright waits for navigation automatically
    await expect(page).toHaveURL('/dashboard');
    await expect(page.getByRole('heading', { name: 'Welcome' })).toBeVisible();
  });

  test('does not allow empty form submission', async ({ page }) => {
    await page.goto('/login');

    // Click submit without filling anything
    await page.getByRole('button', { name: 'Log in' }).click();

    // Browser's built-in validation should trigger
    // Check that the email field has the :invalid state
    const emailInput = page.getByLabel('Email');
    await expect(emailInput).toHaveAttribute('required', '');
    await expect(page).toHaveURL('/login');
  });

});
The test.describe() block groups related tests together. It does not affect how tests run, but it makes the output easier to read and lets you target a whole group with npx playwright test --grep "Login page".
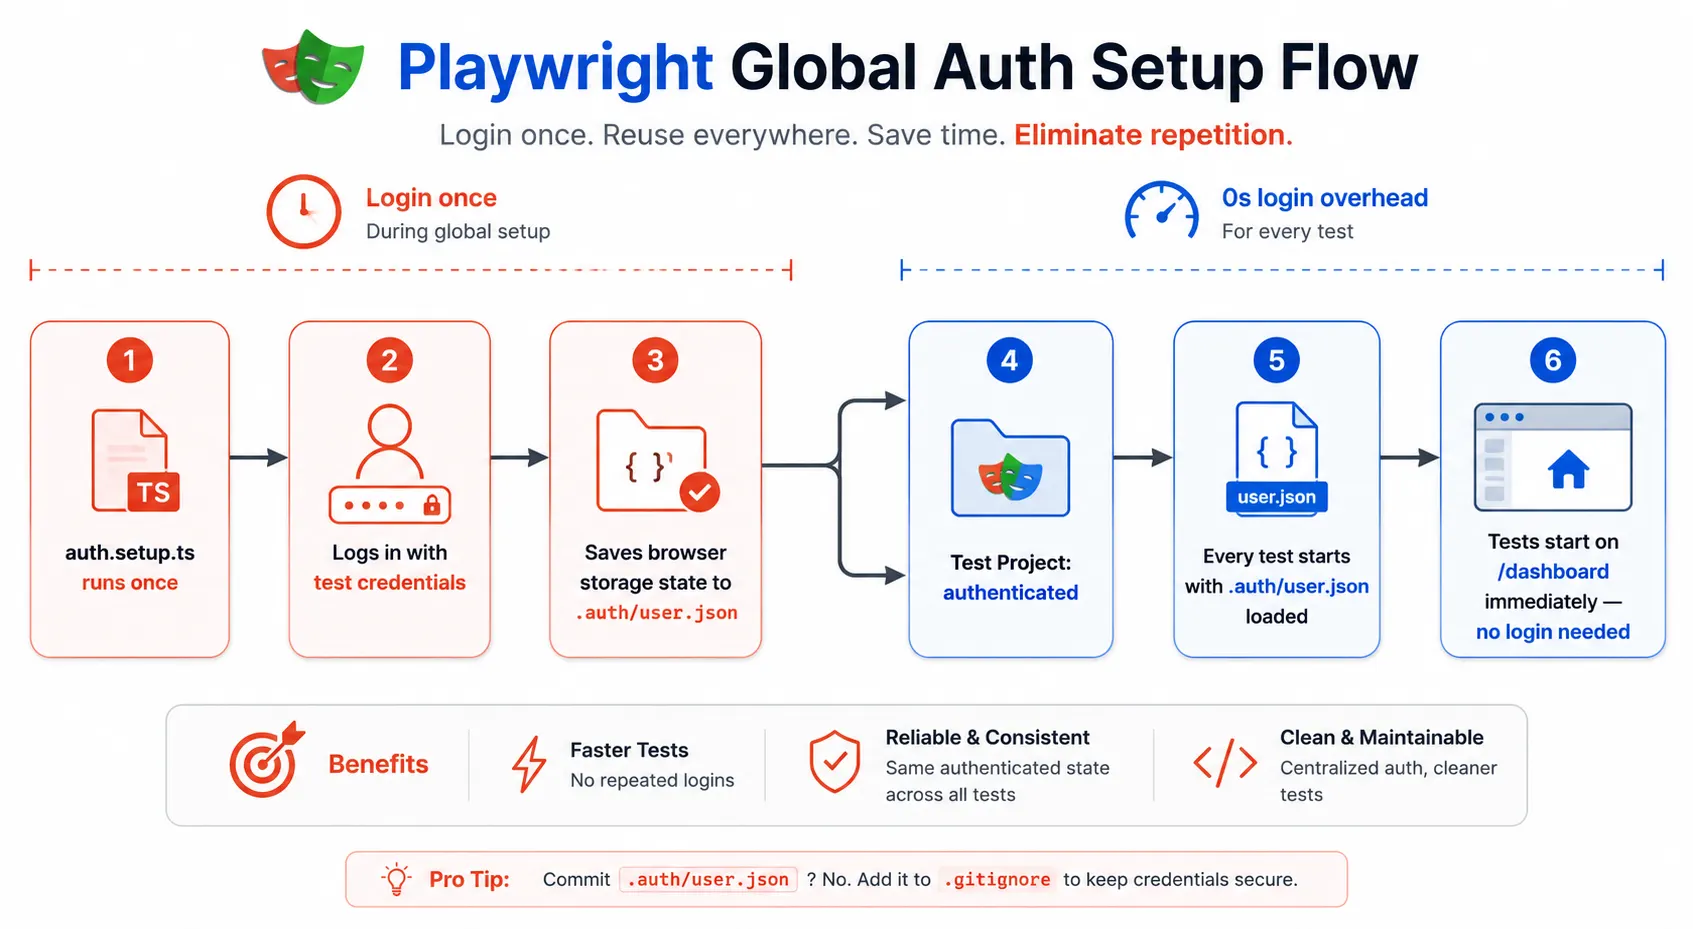
Step 7: Skip repeated login with the global setup
If you are testing a logged-in application, logging in before every single test is slow and wasteful. Playwright has a first-class solution for this through its global setup and storage state feature.
// tests/auth.setup.ts
import { test as setup } from '@playwright/test';
import path from 'path';

// Path where the authenticated browser state gets saved
const authFile = path.join(__dirname, '../.auth/user.json');

setup('authenticate', async ({ page }) => {
  // Perform your real login once
  await page.goto('/login');
  await page.getByLabel('Email').fill(process.env.TEST_EMAIL!);
  await page.getByLabel('Password').fill(process.env.TEST_PASSWORD!);
  await page.getByRole('button', { name: 'Log in' }).click();
  await page.waitForURL('/dashboard');

  // Save the browser cookies and localStorage to a file
  await page.context().storageState({ path: authFile });
});
// playwright.config.ts (add this to projects)
{
  name: 'authenticated',
  use: {
    ...devices['Desktop Chrome'],
    // Reuse the saved auth state for every test in this project
    storageState: '.auth/user.json',
  },
  dependencies: ['setup'],  // Run auth.setup.ts first
},
With this setup, Playwright logs in once, saves the session cookies to a file, and every subsequent test in the authenticated project starts with a pre-logged-in browser. On our test suite, this single change cut test execution time in half because we eliminated fifty login flows from the critical path.
Step 8: Organize tests with the Page Object Model
Once you have more than ten tests, you will start noticing repetition. The same getByLabel('Email') call appears in five different test files. When the label text changes in the UI, you update it in five places. The Page Object Model solves this by putting all the selectors and actions for a page into a single class.
// tests/pages/LoginPage.ts
import { Page, Locator } from '@playwright/test';

export class LoginPage {
  // Store references to elements as class properties
  readonly emailInput: Locator;
  readonly passwordInput: Locator;
  readonly submitButton: Locator;
  readonly errorMessage: Locator;

  constructor(private page: Page) {
    this.emailInput = page.getByLabel('Email');
    this.passwordInput = page.getByLabel('Password');
    this.submitButton = page.getByRole('button', { name: 'Log in' });
    this.errorMessage = page.getByRole('alert');
  }

  // Navigate to the login page
  async goto() {
    await this.page.goto('/login');
  }

  // Login action encapsulated in one method
  async login(email: string, password: string) {
    await this.emailInput.fill(email);
    await this.passwordInput.fill(password);
    await this.submitButton.click();
  }
}
// tests/login.spec.ts — now using the Page Object
import { test, expect } from '@playwright/test';
import { LoginPage } from './pages/LoginPage';

test('valid login redirects to dashboard', async ({ page }) => {
  const loginPage = new LoginPage(page);

  await loginPage.goto();
  await loginPage.login('user@example.com', 'correctpassword');

  await expect(page).toHaveURL('/dashboard');
});

test('invalid login shows error', async ({ page }) => {
  const loginPage = new LoginPage(page);

  await loginPage.goto();
  await loginPage.login('wrong@example.com', 'wrongpassword');

  await expect(loginPage.errorMessage).toBeVisible();
});
The test code now reads like a description of what the user is doing, not a list of DOM queries. When the “Log in” button text changes to “Sign in”, you update the LoginPage class in one place, and every test that uses it continues to work.
Step 9: Add it to CI with GitHub Actions
The npm init playwright@latest command already generated a GitHub Actions workflow file. Open it and verify it looks like this:
# .github/workflows/playwright.yml
name: Playwright Tests

on:
  push:
    branches: [main, develop]
  pull_request:
    branches: [main]

jobs:
  test:
    timeout-minutes: 60
    runs-on: ubuntu-latest

    steps:
      - uses: actions/checkout@v4

      - uses: actions/setup-node@v4
        with:
          node-version: 22

      - name: Install dependencies
        run: npm ci

      - name: Install Playwright browsers
        run: npx playwright install --with-deps

      - name: Start application
        run: npm run build && npm run start &
        env:
          TEST_EMAIL: ${{ secrets.TEST_EMAIL }}
          TEST_PASSWORD: ${{ secrets.TEST_PASSWORD }}

      - name: Wait for application to be ready
        run: npx wait-on http://localhost:3000

      - name: Run Playwright tests
        run: npx playwright test

      - name: Upload test report on failure
        uses: actions/upload-artifact@v4
        if: failure()
        with:
          name: playwright-report
          path: playwright-report/
          retention-days: 7
The last step is the one that saves you most often. When a test fails in CI, you download the artifact, run npx playwright show-report against it, and get the full visual trace of what happened. You do not have to guess from a single error message in a log file.
Add TEST_EMAIL and TEST_PASSWORD as repository secrets in your GitHub settings. Never hardcode test credentials in the workflow file or in any file that gets committed to version control.
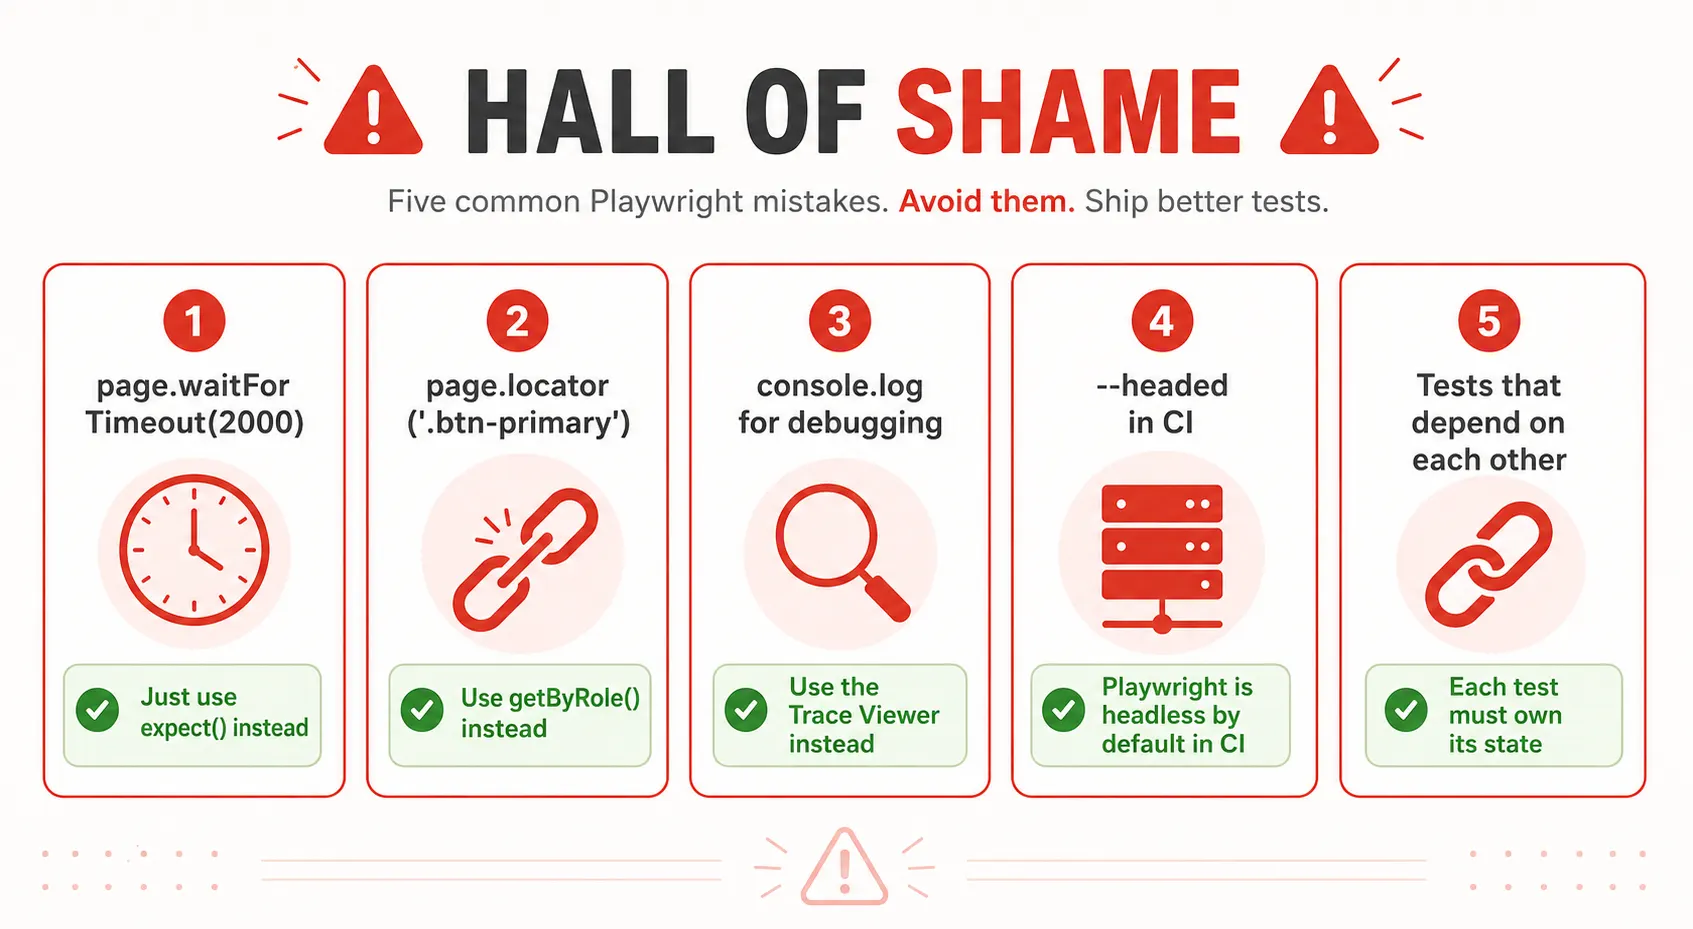
Common mistakes I made, so you do not have to
Learning Playwright is fast. Unlearning a few habits from older tools takes a bit longer. These are the mistakes I see most often from developers making the switch.
Using CSS selectors for everything. I covered this earlier, but it is worth repeating. If your test breaks every time a designer changes a class name, the test is not adding value. Start with getByRole() and getByLabel() and only fall back to CSS when there is genuinely no accessible alternative.
Calling page.waitForTimeout(2000). This is Thread.sleep() with better naming. It is never the right answer. If a test is failing because something has not appeared yet, the fix is to await an expect() assertion on that element, not to add an arbitrary delay. Playwright will wait for it automatically.
Not using the Trace Viewer for debugging. The most common debugging approach I see from new Playwright users is adding console.log() statements. The Trace Viewer shows you a video of exactly what the browser did, every network request, every DOM change, and every assertion result. It is always faster than console logging.
Running tests in headless mode in CI. Playwright tests run headless by default in CI environments. Running them headed in CI wastes resources and is usually the result of adding --headed during local debugging and forgetting to remove it.
Not isolating tests from each other. Each test should start from a known state and not depend on side effects from a previous test. Playwright creates a new browser context for each test automatically, which handles most isolation. But if your tests share a database and one test creates a record that another test expects not to exist, you have a problem that Playwright cannot solve for you.
Playwright quick reference: everything at a glance
| Task | The right way in Playwright | What to avoid |
|---|---|---|
| Find a button | page.getByRole('button', { name: 'Submit' }) | page.locator('.submit-btn') |
| Find a form input | page.getByLabel('Email address') | page.locator('#email') |
| Fill a text input | await input.fill('value') | await input.type('value') (slow, key by key) |
| Wait for something | await expect(element).toBeVisible() | await page.waitForTimeout(2000) |
| Assert URL changed | await expect(page).toHaveURL('/dashboard') | Checking page.url() with a manual delay |
| Assert text content | await expect(element).toHaveText('Expected') | expect(await element.innerText()).toBe('Expected') |
| Click a link | await page.getByRole('link', { name: 'About' }).click() | await page.click('a[href="/about"]') |
| Run tests in parallel | Default behavior, configured via workers in config | Running all tests serially with --workers=1 |
| Debug a failure | npx playwright show-report and use Trace Viewer | Adding console.log() throughout the test |
| Skip repeated login | Global setup + storageState in project config | Logging in at the start of every individual test |
| Intercept a network request | await page.route('/api/user', route => route.fulfill({...})) | Setting up a full mock server externally |
| Test on mobile viewport | use: { ...devices['iPhone 14'] } in project config | Manually setting viewport width in each test |
Further reading
- Playwright Official Documentation: Writing Tests
- Playwright Best Practices: Official Guide from Microsoft
- Playwright on GitHub: Source Code, Issues, and Releases
You now have a test suite that will not lie to you
The thing I hated most about my old Selenium tests was not that they were slow. It was that I could not trust them. A green CI run meant “the tests passed,” not “the application works.” The two things had drifted apart so much that the tests had become noise rather than signal.
Playwright changed that. Not because it is magic, but because its defaults are sane. Auto-waiting means assertions check the actual current state of the DOM, not the state it was in 200 milliseconds ago. Role-based locators mean a CSS refactor does not silently break your test coverage. Isolated browser contexts mean tests cannot contaminate each other.
What you have after following this tutorial is the foundation: a working install, a real test for navigation, a form interaction test, a global auth setup, a Page Object, and a CI pipeline. Every Playwright codebase I have worked on since making the switch grew from exactly this starting point.
The first time your CI catches a real regression that would have shipped to production, you will understand why that Tuesday night was worth it.