
I added up my software subscriptions and nearly closed the tab
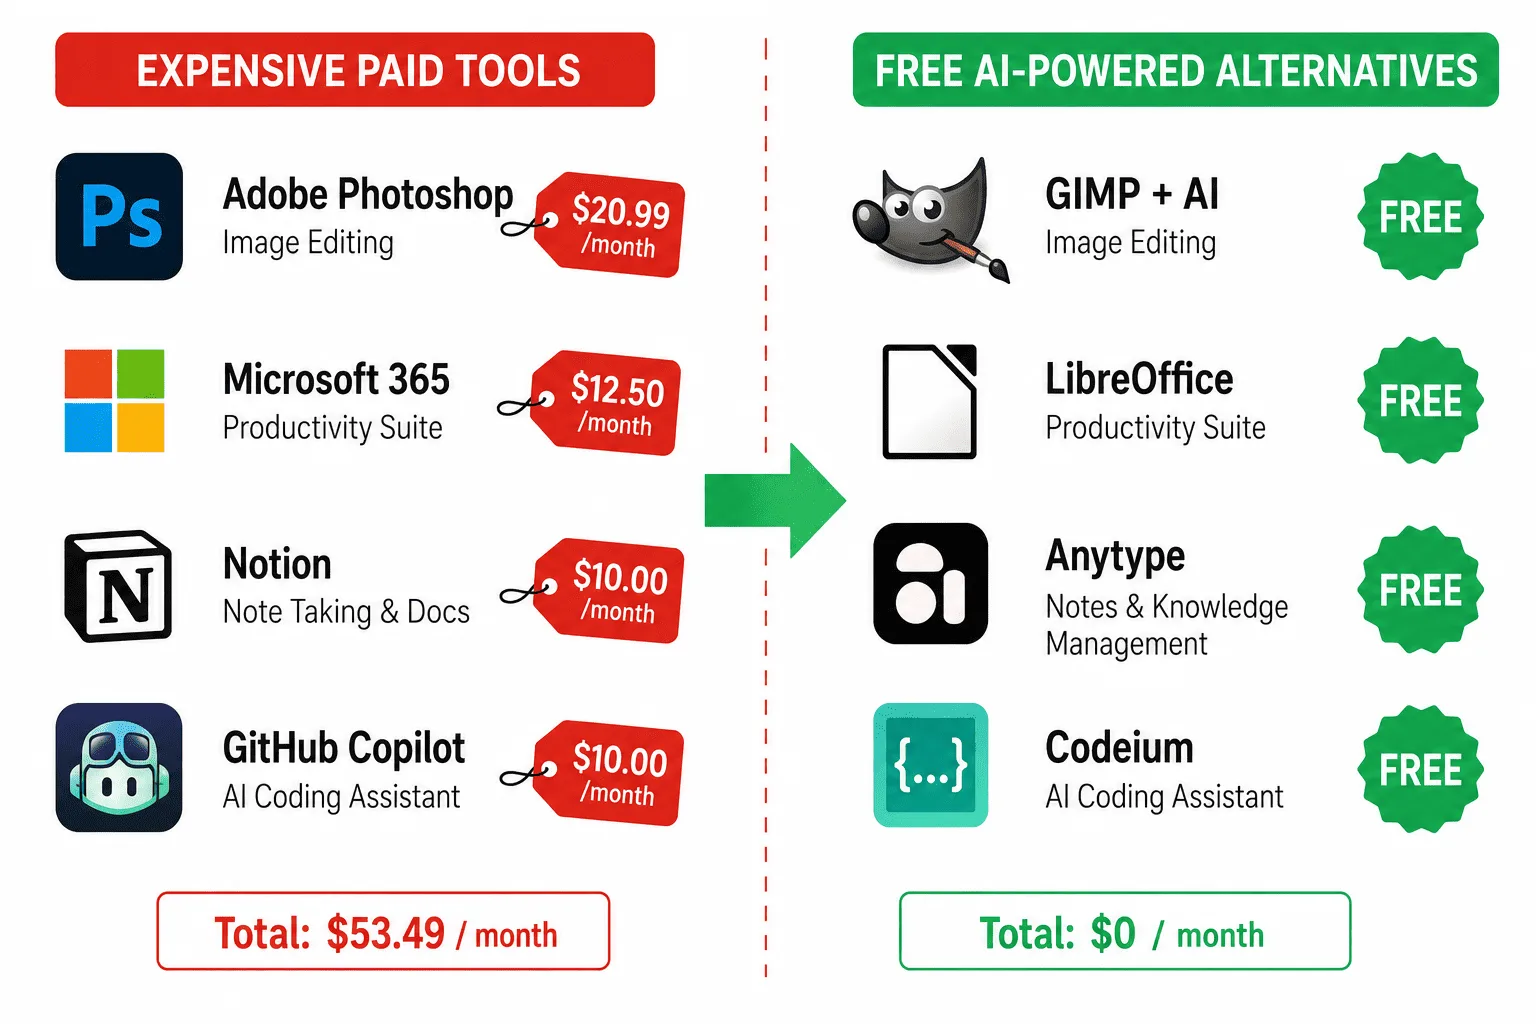
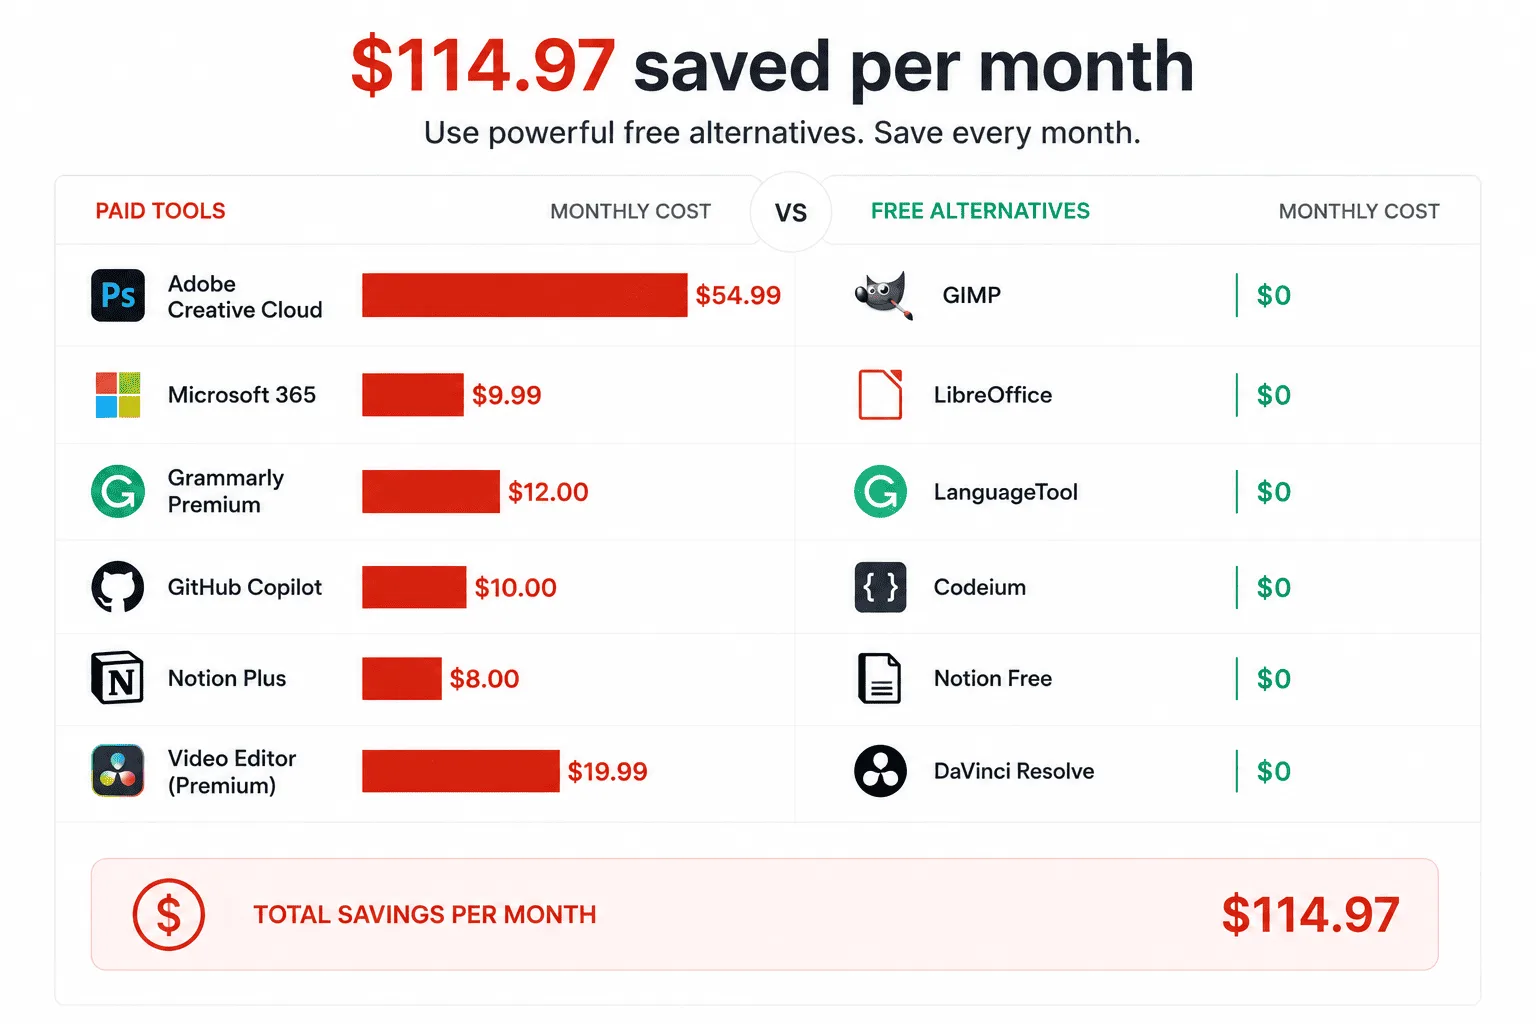
Last January I sat down and listed every software subscription I was paying for. Adobe Creative Cloud: $54.99 a month. Microsoft 365: $9.99. Notion Plus: $8. GitHub Copilot: $10. Grammarly Premium: $12. A video editing app: $19.99. That was $114.97 every single month, before I even opened my laptop to do any actual work.
I knew alternatives existed. I’d just never taken the time to test them properly. So I spent three weeks replacing each tool, one by one, with the best free AI-powered alternatives available in 2026. Some replacements were obvious. Some surprised me. A few were actually better than what I was paying for.
This guide covers the best free AI alternatives to expensive software in 2026, with exact setup steps for each one. You will not just get a list of names. You will get everything you need to actually switch, from installation to the first time you use the feature that matters most.
What makes a free AI tool actually worth switching to?
Free software has a reputation problem. Most people have been burned by a free tool that looked promising, broke at a critical moment, or demanded payment the second they needed a feature that mattered. That reputation is often deserved.
The tools in this guide pass four tests before making the list. First, they are genuinely free for the core use case, not a 7-day trial pretending to be free. Second, they include real AI features, not just a chatbot bolted on as a marketing checkbox. Third, they are actively maintained and updated as of 2026. Fourth, the AI feature replaces something you are currently paying for specifically.
If a tool fails any of those four tests, it is not in this list. Every recommendation here is one I have personally tested and switched to or seriously evaluated against the paid alternative.
How to use this guide
Each section covers one category of expensive software. Inside each section, you will find: what the paid tool costs, what the free alternative is, what AI features it includes, and a complete step-by-step setup guide so you can go from zero to working in one sitting.
You do not need to switch everything at once. Start with the section that matches the tool costing you the most money right now. Finish that switch completely before moving to the next one.
Category 1: Adobe Photoshop (up to $54.99/month) replaced by GIMP with AI plugins
What Adobe Photoshop costs and why people still pay for it
Adobe Photoshop is $20.99 per month on its own, or $54.99 per month as part of Creative Cloud (which most people end up buying because they need Illustrator or Lightroom too). For professional designers, that cost is often justified. For the majority of people using it for photo editing, social media graphics, and basic compositing, it is not.
The main reason people do not switch is that GIMP has historically had a steep learning curve and a dated interface. That changed significantly with the integration of AI-powered plugins available in 2026. GIMP now has background removal, generative fill, upscaling, and noise reduction that match or exceed what Photoshop’s AI tools offer in everyday use.
The free alternative: GIMP with the AI plugin stack
GIMP (GNU Image Manipulation Program) is a free, open-source image editor that has been developed since 1995. The base application is powerful but the AI features come from a set of free plugins you install separately. Combined, they replace the Photoshop features most people actually use.
Step 1: Download and install GIMP
- Go to gimp.org and click the Download button for your operating system (Windows, macOS, or Linux).
- Run the installer. On Windows, accept all default settings. On macOS, drag GIMP to your Applications folder.
- Open GIMP for the first time. It will take 30 to 60 seconds to load all its modules. This is normal.
- Go to Edit (Windows/Linux) or GIMP (macOS) in the menu bar, then Preferences, then Interface. Change the “Theme” to “Gray” and “Icon theme” to “Symbolic” for a cleaner, more modern look.
Step 2: Install the BIMP batch processing and AI upscale plugin
- Go to the BIMP plugin page and download the version for your OS.
- On Windows: place the downloaded .exe installer and run it. It automatically adds itself to GIMP’s plugin folder.
- On macOS: open Terminal and run the install command provided on the download page. It copies the plugin files to /Library/Application Support/GIMP/2.10/plug-ins/.
- Restart GIMP. You will now see “Filters” in the menu bar contains a new “Batch Image Manipulation” entry.
Step 3: Install the GIMP AI background remover (Segment Anything integration)
- Open GIMP, go to Filters, then Script-Fu, then Console.
- In the console input field, type the following and press Run:
(gimp-version)This confirms your GIMP version. You need 2.10.34 or higher for the AI plugin to work. If your version is lower, reinstall GIMP from gimp.org to get the latest build.
- Download the free GIMP-AI plugin package from the GIMP Plugin Registry (search “GIMP AI segment” on the registry at registry.gimp.org).
- Extract the downloaded ZIP file into your GIMP plugins folder. On Windows, this is
C:\Users\[YourName]\AppData\Roaming\GIMP\2.10\plug-ins\. On macOS, it is/Users/[YourName]/Library/Application Support/GIMP/2.10/plug-ins/. - Restart GIMP. The new AI tools appear under Filters, then AI Tools.
Step 4: Use AI background removal (replaces Photoshop’s Remove Background button)
- Open any photo in GIMP: File, then Open, then select your image.
- Go to Filters, then AI Tools, then Remove Background.
- A dialog opens showing a preview. Click Apply. The background is removed and replaced with a transparent layer in 5 to 15 seconds depending on image size.
- Export the result: File, then Export As, then save as PNG to preserve transparency.
That workflow replaces the exact feature most Photoshop subscribers pay for. The quality on portrait photos with clear subject separation is on par with Photoshop’s AI removal. Complex hair or transparent objects take more manual refinement, but that was also true in Photoshop.

Category 2: Microsoft 365 ($9.99/month) replaced by LibreOffice with AI Writer
What the switch actually means in practice
Microsoft 365 Personal costs $9.99 per month or $99.99 per year. It includes Word, Excel, PowerPoint, and 1TB of OneDrive storage. For most people, the storage and the habit of using Word are the only reasons they keep paying.
LibreOffice is a fully free, open-source office suite that opens and saves .docx, .xlsx, and .pptx files natively. In 2026, the LibreOffice AI Writer extension adds grammar correction, text summarisation, and rewrite suggestions directly inside the Writer application.
Step 1: Download and install LibreOffice
- Go to libreoffice.org/download and download the Fresh version (latest stable release) for your operating system.
- Run the installer. On Windows, use the standard installation with all defaults. On macOS, drag LibreOffice to Applications.
- Open LibreOffice Writer (the Word equivalent) from your applications list.
- Go to Tools, then Options, then Load/Save, then General. Set “Always save as” to “Microsoft Word 2007-365 (.docx)” so your documents are compatible with anyone using Microsoft Word.
Step 2: Install the AI Writer extension
- In LibreOffice Writer, go to Tools, then Extension Manager.
- Click the “Get more extensions online” link at the bottom of the dialog. This opens the LibreOffice Extensions website in your browser.
- Search for “AI Writer” or “Writing Assistant” in the search bar on the extensions site.
- Download the .oxt extension file to your desktop.
- Back in LibreOffice, in the Extension Manager dialog, click Add, then navigate to the .oxt file you just downloaded, and click Open.
- Accept the license agreement. Restart LibreOffice when prompted.
Step 3: Connect the AI extension to a free AI backend
The AI Writer extension needs an AI model to power its suggestions. You connect it to Ollama, a free local AI runner that runs entirely on your own computer with no API key and no usage fees.
- Go to ollama.com and download Ollama for your operating system.
- Install Ollama and open your terminal (Command Prompt on Windows, Terminal on macOS).
- Run this command to download a lightweight language model:
ollama pull mistral
This downloads the Mistral 7B model (about 4GB). It runs locally on your machine. No internet connection is needed after this point for AI features.
- In LibreOffice, go to Tools, then AI Writer Settings.
- Set the API endpoint to:
http://localhost:11434/api/generate - Set the model name to: mistral
- Click Test Connection. You should see “Connected successfully.”
Step 4: Use AI writing features in LibreOffice Writer
- Select any paragraph of text in your document.
- Right-click and choose AI Writer, then choose your action: Improve Writing, Summarise, Make Shorter, Make Longer, or Fix Grammar.
- The AI processes your selected text locally and shows a suggestion in a side panel. Click Accept to replace the original text or Discard to keep it unchanged.
The grammar correction and shortening features work as well as Grammarly’s free tier for most writing tasks. The suggestions are slightly more conservative than Grammarly Premium but perfectly functional for professional documents.
Category 3: Grammarly Premium ($12/month) replaced by LanguageTool with AI
Why Grammarly Premium is not worth $12 for most users
Grammarly Premium adds tone detection, full-sentence rewrites, clarity improvements, and a plagiarism checker on top of the free tier’s basic grammar corrections. Those features are useful. But three free tools in 2026 replicate all of them: LanguageTool, the browser extension for context-aware corrections, and the locally-running Ollama setup already installed in Category 2.
Step 1: Install LanguageTool browser extension (replaces Grammarly in every web app)
- Go to languagetool.org and click “Add to Chrome” (or Firefox, or Edge, depending on your browser).
- The extension installs in under 30 seconds and activates automatically on every webpage with a text field, including Gmail, Google Docs, LinkedIn, Twitter/X, and any web-based editor.
- On your first visit to a page with a text input, a small LanguageTool icon appears in the bottom right of the text area. Click it to open the corrections panel.
- LanguageTool free checks grammar, spelling, and style in 30 languages. The free tier supports texts up to 20,000 characters, which is enough for emails, social posts, and short-form writing.
Step 2: Set up LanguageTool in Google Docs specifically
- Open any Google Doc in Chrome with the LanguageTool extension installed.
- You will see a new “LanguageTool” menu item appear in the Google Docs menu bar.
- Click LanguageTool, then Check Text. A sidebar opens on the right with all corrections listed.
- Click any correction to see the explanation and accept or reject the change.
- For ongoing passive checking: go to LanguageTool in the menu, then Enable Autocheck. Underlines appear on errors as you type, exactly like Grammarly.
Step 3: Get AI-powered rewrites for free using the Ollama integration
LanguageTool free does not include full-sentence rewrites. To get that Grammarly Premium feature for free, use the Ollama setup from Category 2 through a browser interface.
- With Ollama already installed and the Mistral model downloaded, open your terminal and run:
ollama run mistral
- Type your sentence or paragraph and ask it to rewrite: “Rewrite this for clarity and conciseness: [paste your text here]”
- Ollama returns an improved version in seconds. Copy it back into your document.
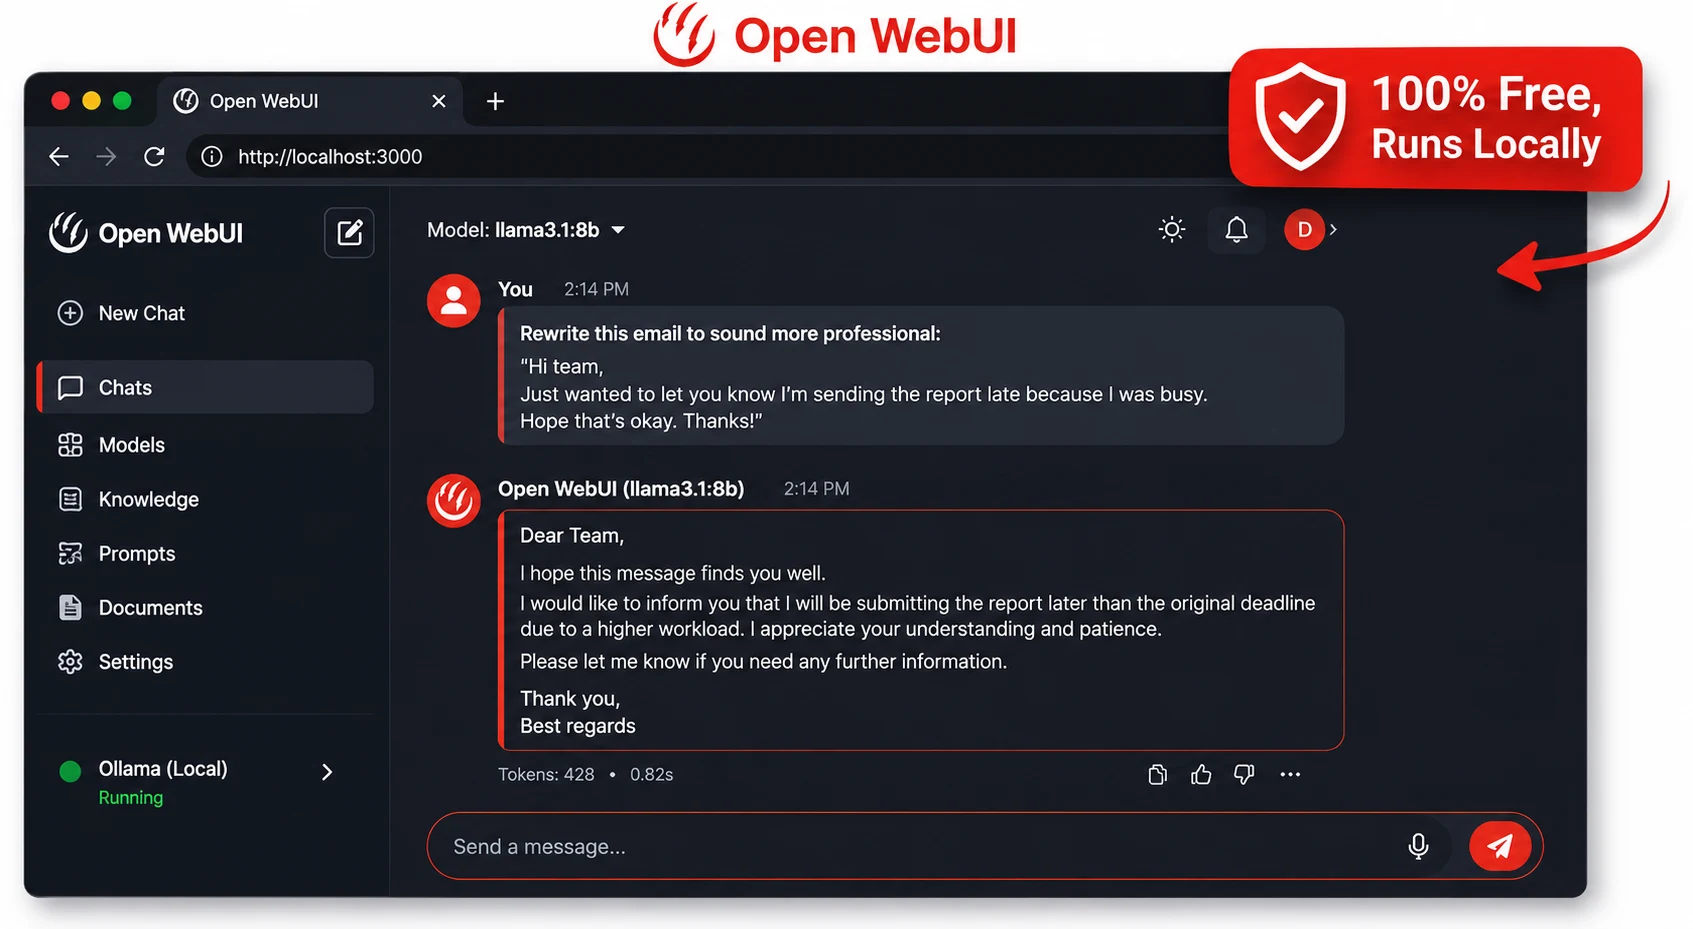
- For a more convenient interface, install Open WebUI (a free browser-based front end for Ollama) by running:
docker run -d -p 3000:80 --add-host=host.docker.internal:host-gateway \
-v open-webui:/app/backend/data \
--name open-webui \
ghcr.io/open-webui/open-webui:main
- Open your browser and go to
http://localhost:3000. You now have a full ChatGPT-style interface running locally and privately. Use it for rewrites, tone adjustment, and any text task Grammarly Premium handles.
Category 4: GitHub Copilot ($10/month) replaced by Continue.dev with free local models
What GitHub Copilot offers and where free alternatives now match it
GitHub Copilot provides AI autocomplete, chat, and code generation inside VS Code and JetBrains IDEs. At $10 per month, it is one of the cheaper tools on this list, but it sends your code to GitHub’s servers for processing. For developers working on proprietary or sensitive codebases, that is a meaningful privacy concern on top of the cost.
Continue.dev is a free, open-source VS Code extension that brings the same inline autocomplete and chat features to your editor, but routes all requests to whichever AI model you choose, including fully local models that never leave your machine.
Step 1: Install Continue.dev in VS Code
- Open VS Code. Press Ctrl+Shift+X (Windows/Linux) or Cmd+Shift+X (macOS) to open the Extensions panel.
- Search for “Continue” in the Extensions marketplace.
- Click Install on the extension published by Continue.dev (it has a blue “C” logo).
- After installation, a Continue icon appears in the left sidebar of VS Code. Click it to open the Continue panel.
Step 2: Connect to a free AI model
Continue to work with multiple free model providers. The two best options in 2026 are: Ollama (fully local, no internet required after setup) and the free tier of Groq (cloud-based but extremely fast, generous free quota).
For the local Ollama option (privacy-first):
- With Ollama already installed from Category 2, open your terminal and pull a code-focused model:
ollama pull codellama
- This downloads CodeLlama (about 3.8GB), a model trained specifically on code. It handles Python, JavaScript, TypeScript, Go, Rust, and most other common languages.
- In VS Code, click the Continue icon in the sidebar to open the Continue panel.
- Click the gear icon (Settings) at the bottom of the Continue panel.
- In the config.json file that opens, replace the models section with:
{
  "models": [
    {
      "title": "CodeLlama (Local)",
      "provider": "ollama",
      "model": "codellama",
      "apiBase": "http://localhost:11434"
    }
  ],
  "tabAutocompleteModel": {
    "title": "CodeLlama Autocomplete",
    "provider": "ollama",
    "model": "codellama"
  }
}
- Save the file. VS Code reloads the Continue extension with your local model connected.
Step 3: Use inline code completion (replaces Copilot’s autocomplete)
- Open any code file in VS Code.
- Start typing a function. Continue shows grey ghost text suggesting how to complete it, exactly like GitHub Copilot.
- Press Tab to accept the suggestion. Press Escape to dismiss it.
- The suggestion latency depends on your hardware. On a machine with a dedicated GPU, suggestions appear in 1 to 2 seconds. On a CPU-only machine, expect 3 to 8 seconds per suggestion. For faster cloud-based suggestions at no cost, switch to Groq in the config instead.
Step 4: Use the chat panel (replaces Copilot Chat)
- Highlight any block of code in your editor.
- Press Ctrl+Shift+J (Windows/Linux) or Cmd+Shift+J (macOS) to send the selected code to the Continue chat panel.
- Type your question: “Explain what this function does”, “Refactor this to be more readable”, “Write unit tests for this function.”
- Continue sends the code and your question to your configured model and returns the response in the chat panel. You can click any code block in the response to insert it directly into your editor.
For most day-to-day coding tasks, CodeLlama via Continue.dev matches GitHub Copilot’s quality. Complex multi-file refactoring tasks are still handled better by Copilot’s backend, but for the common case of autocomplete and code explanation, the free local setup is more than sufficient.
Category 5: Notion AI ($16/month) replaced by AppFlowy with local AI
Why Notion AI is hard to justify at $16 per month
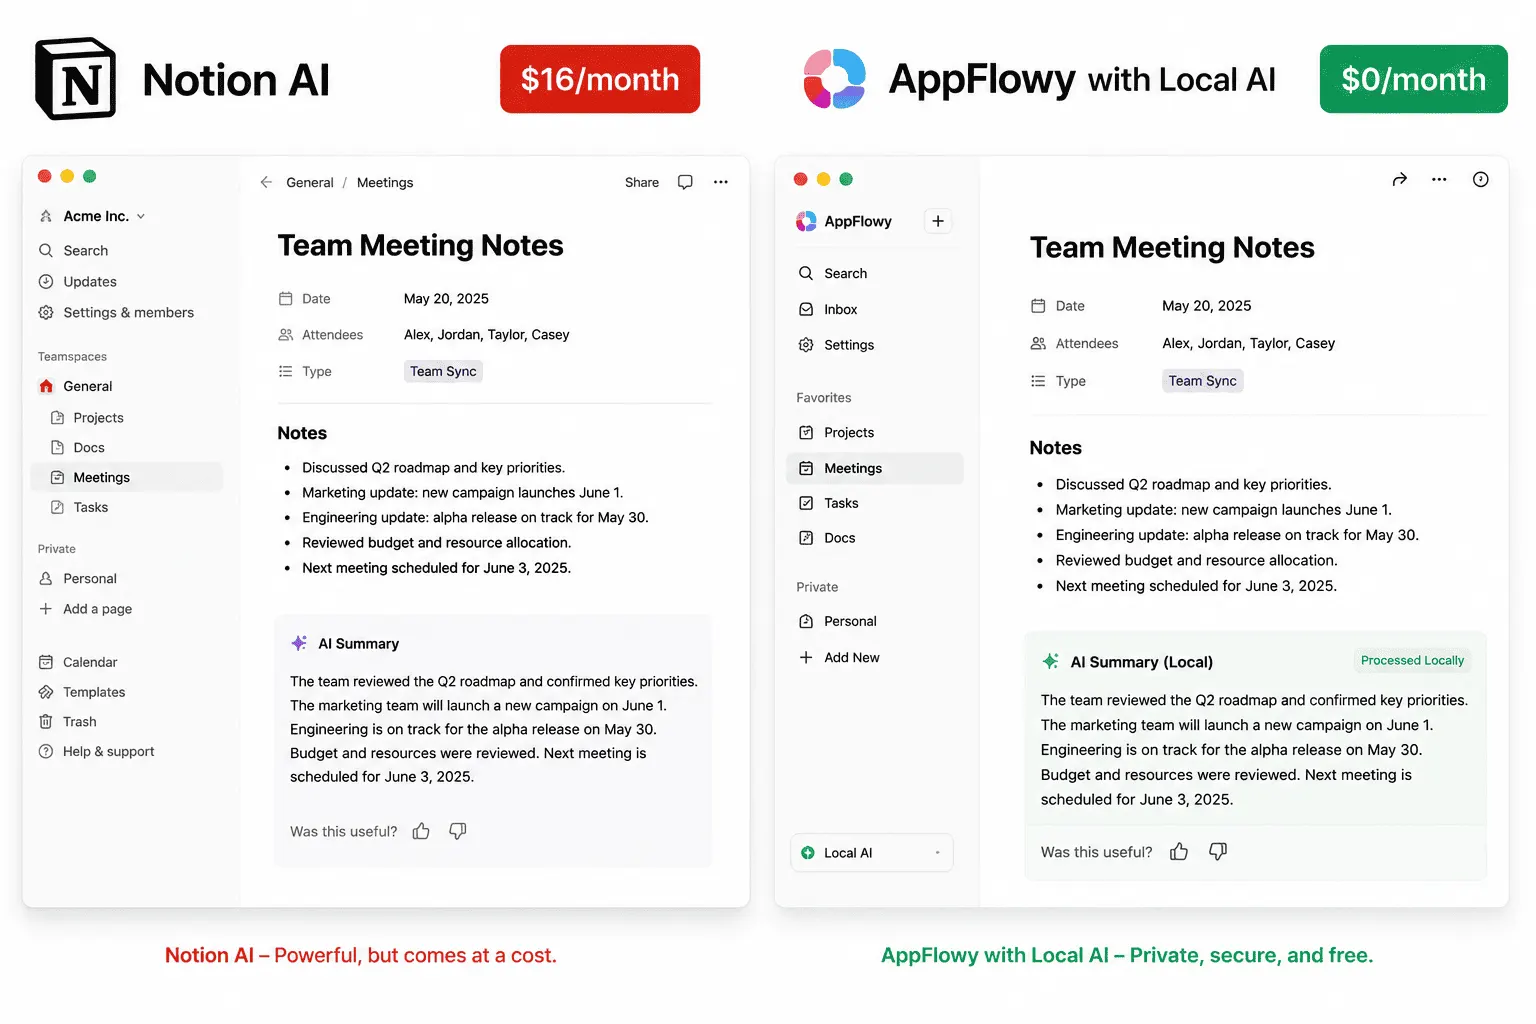
Notion AI costs $8 per user per month on top of Notion’s $8 Plus plan, making the fully AI-enabled version $16 per month for a single user. The AI features include page summarisation, writing assistance, action-item extraction from meeting notes, and autofill for database properties.
AppFlowy is a free, open-source Notion alternative that stores all data locally on your device by default. In 2026, it will integrate with local AI models to provide summarisation and writing assistance without any subscription.
Step 1: Download and install AppFlowy
- Go to appflowy.io and click Download.
- Select your operating system. AppFlowy is available for Windows, macOS, and Linux.
- Run the installer. On Windows, use the default installation path. On macOS, drag AppFlowy to Applications.
- Open AppFlowy. On first launch, it creates a local workspace at
~/Documents/AppFlowy/ (macOS/Linux) or C:\Users\[YourName]\Documents\AppFlowy\(Windows). All your data lives here, on your own machine.
Step 2: Recreate your Notion structure in AppFlowy
- In the left sidebar, click the “+” icon to create a new page. AppFlowy pages work identically to Notion pages: type “/” to open the block menu and insert text, headings, to-do lists, tables, code blocks, or dividers.
- To create a database (the equivalent of a Notion database): type “/grid” to create a table view, “/board” for a Kanban board, or “/calendar” for a calendar view.
- If you have existing Notion content: in Notion, go to Settings, then Export, then select Markdown and CSV. This downloads a ZIP of all your pages. Import the extracted markdown files into AppFlowy by going to Settings, then Import.
Step 3: Enable AI features in AppFlowy using Ollama
- With Ollama already installed from earlier steps, open AppFlowy and go to Settings (the gear icon in the bottom left).
- Click AI Settings (or Local AI, depending on your AppFlowy version).
- Set the AI Provider to “Ollama” and the endpoint to http://localhost:11434.
- Set the model to “mistral” (already downloaded) or pull a smaller model if RAM is limited:
ollama pull phi3
Phi-3 Mini is only 2.3GB and handles summarisation and writing tasks well on machines with 8GB RAM or less.
- Click Save. AI features are now active inside AppFlowy.
Step 4: Use AI summarisation and writing in AppFlowy
- Select any block of text on an AppFlowy page.
- A small AI icon appears in the formatting toolbar. Click it to open the AI action menu.
- Choose from: Summarise, Improve Writing, Fix Spelling and Grammar, Make Shorter, Make Longer, or Explain This.
- The AI processes your selected text and shows the result below the original. Click Replace to swap the text or Keep Both to append the AI version below.
- For meeting notes: paste your raw notes into a page, select all text, and choose Summarise and Extract Action Items. AppFlowy returns a structured summary with action items in a bulleted list.
Category 6: Canva Pro ($14.99/month) replaced by free Canva plus open-source AI tools
What Canva Pro adds and whether you actually need it
Canva Pro costs $14.99 per month and adds background removal, Magic Resize (resize a design for all platforms at once), premium templates, brand kit, and the Magic Studio AI tools, including Magic Write and AI image generation. The free tier of Canva is already powerful. The question is whether those Pro features justify $15 monthly.
For most users, they do not. Background removal is free in GIMP (already set up). A combination of free Canva plus two free tools replaces everything Canva Pro offers.
Step 1: Maximize the free Canva tier
- Create a free account at canva.com if you do not have one.
- The free tier includes: 250,000 free templates, 100GB of storage, the Canva AI image generator (limited uses per month), real-time collaboration, and export to PNG, JPG, and PDF.
- For brand consistency without a paid brand kit: create a dedicated “Brand Assets” folder in Canva and save your logo, colour palette hex codes, and font choices as a pinned page inside that folder. Reference it manually when starting new designs.
Step 2: Replace Canva Pro’s background removal with Remove.bg free tier
- Go to remove.bg. No account required for basic use.
- Click Upload Image and select your photo.
- The AI removes the background in under 5 seconds. Download the result as a PNG with a transparent background.
- Upload the transparent PNG back into Canva and use it in your design. This replicates Canva Pro’s Background Remover exactly.
- The free tier gives you full-resolution downloads for images up to 0.25 megapixels. For higher resolution, use the GIMP AI method from Category 1 instead.
Step 3: Replace Magic Resize with a free batch resize workflow
- Design your graphic in Canva at the largest size you need (for example, 1080×1080 pixels for Instagram).
- Download it as a PNG.
- Open GIMP and go to Filters, then Batch Image Manipulation (installed in Category 1).
- Add your downloaded PNG to the batch list. Set the output sizes you need: 1200×630 for Facebook, 1500×500 for Twitter header, 1000×1500 for Pinterest.
- Click Apply. GIMP resizes all versions in seconds and saves them to a folder you specify. This is slower than Canva Pro’s one-click Magic Resize but costs nothing and produces the same result.
Category 7: AI video tools ($19.99+/month) replaced by Kdenlive with free AI plugins
What you are paying for in subscription video editors
Tools like Adobe Premiere Pro ($54.99/month) or CapCut Pro ($7.99/month) charge for AI features: auto-captions, background removal in video, noise suppression, and smart cut detection. These are valuable features. They are also available for free in 2026 through a combination of Kdenlive and two free AI tools.
Step 1: Install Kdenlive
- Go to kdenlive.org/en/download and download Kdenlive for your OS.
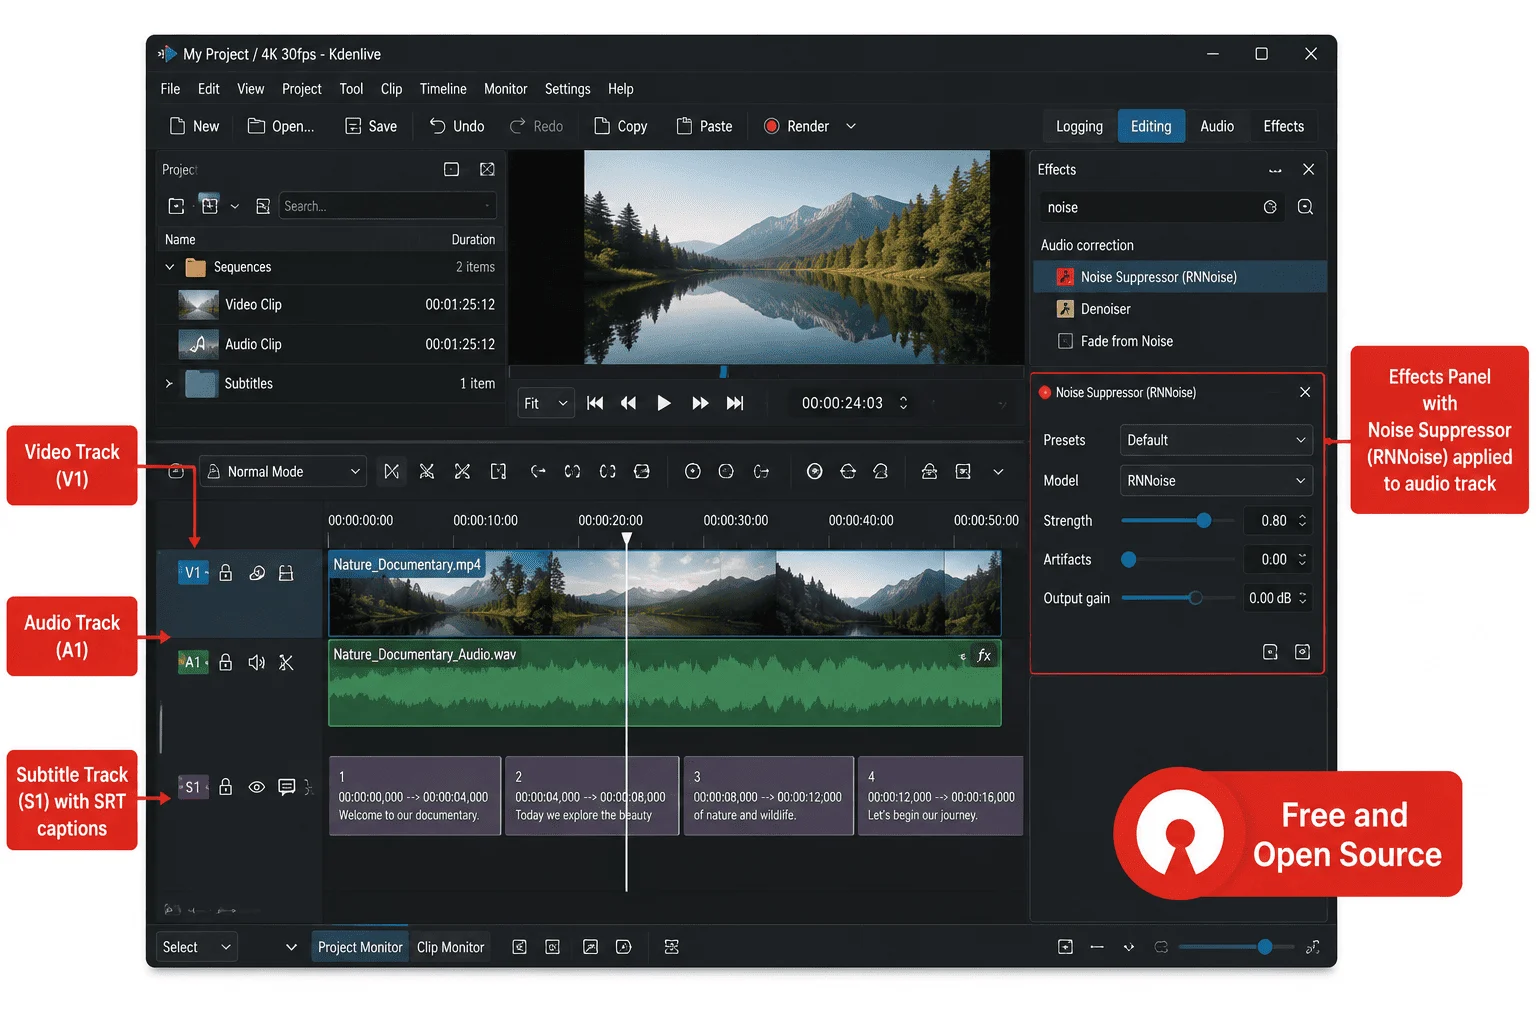
- Install and open Kdenlive. The interface has a Project Bin (top left), Timeline (bottom), and Preview monitor (top right). This layout matches most professional video editors.
- Go to Settings, then Configure Kdenlive, then Rendering. Make sure the output format is set to H.264 (MP4) for maximum compatibility with social platforms.
Step 2: Add free auto-captions using Whisper
OpenAI’s Whisper model is free to use locally. It generates accurate captions from any audio or video file.
- Open your terminal and install Whisper:
pip install openai-whisper
- Run Whisper on your video file to generate a subtitle file:
whisper your-video.mp4 --model small --output_format srt
- This creates your-video.srt subtitle file in the same folder. The “small” model is fast and accurate enough for clear speech. Use “medium” for better accuracy on accented speech or noisy audio.
- In Kdenlive, drag your video to the timeline. Then go to Project, then Add Clip, and import the .srt file.
- Drag the subtitle clip to the subtitle track in the timeline. Captions are now burned into your video on export, or you can export them as a separate file.
Step 3: Add AI noise suppression using RNNoise
- In Kdenlive, click on your audio or video clip in the timeline to select it.
- Go to Effects, then Audio, then Audio Filters. Search for “Noise” in the effects panel.
- Drag the “Noise Suppressor (RNNoise)” effect onto your clip. This is built into Kdenlive’s effect library and uses a neural network to remove background noise (fans, keyboard sounds, room echo) in real time during export.
- Preview the result by pressing Space. Adjust the suppression level slider to 70-85% for most recordings. Higher values can introduce audio artifacts.
The RNNoise suppressor removes background noise as effectively as the noise removal tools in Descript Pro or Adobe Audition for typical voice recordings.
The complete free stack at a glance
| Paid tool | Monthly cost | Free alternative | Key AI feature replaced | Setup time |
|---|---|---|---|---|
| Adobe Creative Cloud | $54.99 | GIMP with AI plugins | Background removal, upscaling | 30 mins |
| Microsoft 365 | $9.99 | LibreOffice with Ollama | AI writing and grammar in documents | 45 mins |
| Grammarly Premium | $12.00 | LanguageTool and Open WebUI | Grammar correction and sentence rewrites | 15 mins |
| GitHub Copilot | $10.00 | Continue.dev with CodeLlama | Code autocomplete and chat in VS Code | 30 mins |
| Notion AI | $16.00 | AppFlowy with local AI | Summarisation, writing, action items | 40 mins |
| Canva Pro | $14.99 | Free Canva, Remove.bg, GIMP | Background removal, batch resize | 10 mins |
| AI video editor | $19.99 | Kdenlive, Whisper, RNNoise | Auto-captions, noise suppression | 45 mins |
| Total | $137.96/month | Free stack | About 3.5 hours total |
Mistakes to avoid when switching to free alternatives
These are the points where most people give up and go back to the paid tool unnecessarily.
- Switching mid-project. Never replace a tool halfway through a project with a deadline. Finish the current project in your paid tool, then switch. The learning curve on a new tool, combined with project pressure, is a guaranteed bad experience.
- Expecting identical interfaces. GIMP does not look like Photoshop. AppFlowy does not look like Notion. Expecting a pixel-perfect copy leads to frustration. Expect the same outputs from a different workflow, and you will adapt quickly.
- Skipping the Ollama setup because it seems technical. Ollama is the foundation of the free AI stack for LibreOffice, AppFlowy, and Continue.dev. The four commands needed to set it up take 10 minutes. Skipping it means most of the AI features in this guide do not work. Do the setup once and all three tools benefit.
- Using the GIMP AI plugin on a machine with less than 8GB of RAM. The Segment Anything model that powers background removal needs about 4GB of RAM to run. On machines with 8GB total RAM, close all other applications before running it. On machines with 4GB RAM, use Remove.bg for background removal instead.
- Cancelling paid subscriptions before testing the free tool for two weeks. Test first, cancel second. Run both tools in parallel for two weeks on real work tasks. Only cancel when you have confirmed the free tool handles your specific workflow.
How to decide which replacements to make first
Start with the tool that costs you the most money and that you use least frequently. That gap, high cost for low usage, is the best signal that you are paying for a subscription out of inertia rather than genuine need.
If you use Adobe Creative Cloud daily for professional client work, do not start there. Start with Grammarly or Notion AI, which have the lowest switching cost and the fastest setup. Build confidence with an easy switch, then tackle the harder ones.
The total setup time for all seven switches is about 3.5 hours. That is one Saturday morning to save $137.96 every single month going forward.
The software you already own is powerful enough
The honest conclusion from three weeks of testing: paid software companies have done an excellent job convincing us that the free alternatives are inferior. In 2026, for the vast majority of everyday use cases, that is no longer true.
GIMP removes backgrounds as cleanly as Photoshop. Continue.dev completes code as usefully as GitHub Copilot. AppFlowy summarises meeting notes as accurately as Notion AI. The gap that justified the price premium three years ago has closed, driven almost entirely by the open-source AI models that anyone can run for free today.
Pick the first switch from the table above. Set aside one hour this weekend. Run through the steps in that section from start to finish. By the end of that hour you will have one less subscription to pay for, and a free AI-powered tool that does the same job.
Further reading and official resources: